

JavaScript Brief Introduction
The JavaScript language was originally developed by Brendan Eich of Netscape as Mocha, later renamed to LiveScript, and finally to JavaScript. It was first publicly introduced in 1995 with version 2.0 of the Netscape browser, and enabled Web authors to embed scripts into an HTML page. Despite the name, JavaScript is not particularly closely related to Java, although both have a similar syntax and a common ancestor (the C and C++ programming language). Due to its flexibility and ease of use, Javascript was quickly adopted by Web developers, prompting Microsoft to develop their own version of JavaScript called Jscript, which was more or less compatible with JavaScript, and which was included with Internet Explorer 3.0 released in 1996. JavaScript is primarily used to manipulate elements within a HTML document through the interface provided by the Document Object Model (DOM). It can set the attributes of a document element, or even create new documents and document elements dynamically. For this reason, an understanding of the DOM is essential for the effective use of JavaScript. Examples of the way in which JavaScpript can be used to provide interactivity to Web pages include opening a new browser window when the user clicks on a link in the current page, validating the contents of a form before the form data is sent to a server-side script, and changing an image as the user rolls over it with the mouse to draw the user's attention to the fact that the image may have special significance as a link (the ubiquitous rollover effect). Because the code is executed locally by the browser's built-in interpreter, the response to user actions is immediate. Javascript is now booming up on server side which is known as nodeJs and need V8 Environment to run. Anyways,A trivial example of the use of JavaScript in a web page is given below.
<!DOCTYPE HTML PUBLIC "-//W3C//DTD HTML 4.01//EN""http://www.w3.org/TR/html4/strict.dtd">
<html>
<head><title>simple page</title></head>
<body>
<script type="text/javascript">
document.write('Hello JavaScript!');
</script>
<noscript>
<p>Your browser does not support JavaScript, or you have JavaScript turned off.</p>
</noscript>
</body>
</html>
When a JavaScript-enabled browser downloads a Web page, any embedded scripts are read and interpreted by the Web browser. Functions intended to be triggered by specific events are usually defined in the head of the document and called when required by a user action. Alternatively, they can be defined in a separate file (with the extension .js) that is referenced within the head of the HTML document and downloaded by the browser together with the HTML document itself. The Document Object Model with which JavaScript interacts is officially defined by the W3C, although in practice, browsers vary in the way they implement the model. Furthermore, not all browsers will execute JavaScript, and most browsers allow the user to disable client-side scripts. Web developers should attempt, therefore, to write standards-compliant scripts, and if possible have their script detect which browser is being used and take appropriate action if scripts are not supported by that particular browser or browser configuration. Like any scripting language, JavaScript provides potential for misuse by hackers. For this reason it is not permitted to perform non web-related actions such as creating files on the user's hard drive. Furthermore, scripts from one site are not allowed to access to data (e.g. passwords or cookies) relating to any other site - a principle referred to as the same origin policy.
Which software do I need?
Please avoid using software such as FrontPage, DreamWeaver or Word with this tutorial. Advanced software will not help you learn Javascript. Instead, it will limit you and slow down your learning curve significantly.
All you need is a free and simple text editor.
For example, Microsoft Windows comes with a program called Notepad. It is usually located in Accessories in the start menu under Programs. Alternatively, you can use a similar text editor e.g. Pico for Linux or Simple Text for Macintosh. A simple text editor is ideal for learning HTML and Javascript because it doesn't affect or change the codes you type. That way, your successes and errors can only be attributed to yourself - not the software. You can use any browser with this tutorial. We encourage you to always keep your browser updated and use the latest version. A browser and a simple text editor is all you need.
Let's get started!
What is JavaScript?
First of all i want to clear that , it is not Java. i mean no way java,It is javaScript .Maybe you already heard about Javascript without really knowing what it is. In this topic you will learn more about what Javascript is and what it can do for you.
Javascript is client side scripting language used to make static html page dynamic
Well , Javascript can be used on server side too . If you have heard about Node.js,it is server side javascript but for now let we understand client side scripting
What can I do with JavaScript?
Javascript is a scripting language that gives life to HTML documents. For example, Javascript covers fonts, colours, margins, lines, height, width, background images, advanced positions and many other things. Just wait and see! HTML can be (mis-)used to add layout to websites. But Javascript offers more options and is more accurate and sophisticated. Javascript is supported by all browsers today. After only a few lessons of this tutorial you will be able to make your own style sheets using Javascript to give your website a new great look.
What is the difference between Javascript and HTML ?
HTML is used to structure content. Javascript is used for formatting structured content. Javascript was invented to remedy this situation by providing web designers with sophisticated layout opportunities supported by all browsers. At the same time, separation of the presentation style of documents from the content of documents, makes site maintenance a lot easier. So we can define html as markup language which is used to create static web document and javascript is scripting language which can make static page dynamic or you can say javascript make webpage interactive,
Why to Use JavaScript and Which benefits JavaScript gives me?
Javascript was a revolution in the world of web design. The concrete benefits of Javascript include:
- control layout of many documents from one single style sheet;
- more precise control of layout;
- apply different layout to different media-types (screen, print, etc.);
- numerous advanced and sophisticated techniques.
- Javascript separates your content from presentation (think MVC).
- With Javascript an entire web site can change look by changing one file
- Using Javascript can lower your bandwidth costs.
- Your HTML is easier to read and understand making maintenance cheaper.
- People with disabilities can access your pages easier.
- Organizations can share the same style across web sites.
- Menus can be created without javascript.
Why JavaScript?
Javascript, or Javascript, is a way to style and present HTML. Whereas the HTML is the meaning or content, the style sheet is the presentation of that document. Styles don’t smell or taste anything like HTML, they have a format of ‘property: value’ and most properties can be applied to most HTML tags.
JavaScript Applications
JavaScript code may be embedded in an HTML document or it may be in a separate file which is referenced from the HTML document. The syntax for each is shown below:
<script type="text/javascript" language="JavaScript" src="site.js"></script> |
This is the code to include an external JavaScript file. In this case the file is named site.js. The main advantage of using an external file is that the code can be shared by many Web pages allowing much easier modifications in the future.
<SCRIPT LANGUAGE="JavaScript"> <!-- JavaScript code is placed here. /* JavaScript comments, such as this, allow the code to be documented *///--> </SCRIPT> |
The structure of embedded code is much the same. Note the HTML comment characters, which allow earlier browsers to skip the JavaScript code which they cannot support.
Comment Indicators
We have already looked, briefly, at comments in the code sample above. The comment in that sample is a multiple line comment indicator. A single line indicator is simply //.
// This is a single line comment
/* And this is a longer section of comment that will span multiple lines */
It is good practice to include comments in all code that you develop, even if it is only you that will be using the code. It is surprising how quickly you forget what the code was intended to do, when you revisit it several weeks or months later.
Comments are even more important if the code is likely to be viewed by other program developers, as they will not, necessarily, know your objectives from the code itself.
Communicating with the User
I am not sure why a chapter entitled variables and data should start with a topic on interactive methods, but it does. There are three methods for communicating with the user:
alert, confirm, prompt and write.- The alert() method displays a pop-up dialog with a text message. alert("Hello my website!");
- The confirm() method also displays a pop-up dialog with a text message, but it now includes the OK and Cancel buttons and will return a true or false value depending on the button clicked.
- The prompt() method goes a stage further and allows the input of text. You may click on the method names to see sample output. If you view this page's source you will also be able to study the embedded JavaScript that facilitates this.
- The write() method allows text to be written to the browser window or document as it is referred to within the JavaScript object model. Because the write() method belongs to the document object it should be referenced thus: document.write()
Variables
JavaScript variables can store four data types but these are not explicitly declared. Variables should be declared, but the data type is not specified. Variable names in JavaScript are case-sensitive and it is good practice to follow the established naming convention. A variable name, and a function name for that matter, should use two words without an intervening space, with the second word capitalised. For example: firstName or bigNumber. The first character should be a letter or an underscore, subsequent characters may be letters, numbers or the underscore. JavaScript contains Keywords, the names of built-in functions, methods and commands, which may not be used as variable or function names.
| JavaScript Keyword | |||
|---|---|---|---|
| break | continue | do | else |
| false | for | function | if |
| in | int | new | null |
| return | switch | true | typeof |
| var | void | while | with |
JavaScript also contains Reserved words that, while not currently in use may be used in the future, cannot be used as variable or function names.
| JavaScript Reserved Word | |||
|---|---|---|---|
| abstract | byte | catch | default |
| delete | extends | final | goto |
| import | interface | native | package |
| protected | short | static | super |
| throw | transient | try | |
Expressions
There are four types of expression in JavaScript. These are Assignment, Arithmetic, String and Logical. An assignment operator assigns a value to a variable, an arithmetic operator perform an arithmetic operation which evaluates to a number and may be assigned to a variable, a string operator evaluates to a string and a logical operator evaluates to a true/false value.
| Operators | ||
|---|---|---|
| Operator | Type | Description |
| = | Assignment | Assigns the value of the right operand to the left operand. |
| += | Assignment | Adds together the operands and assigns the result to the left operand. |
| -= | Assignment | Subtracts the right operand from the left operand and assigns the result to the left operand. |
| *= | Assignment | Multiplies the operands and assigns the result to the left operand. |
| /= | Assignment | Divides the left operand by the right operand and assigns the result to the left operand. |
| %= | Assignment | Divides the left operand by the right operand and assigns the remainder to the left operand. |
| + | Arithmetic | Adds together the operands. |
| - | Arithmetic | Subtracts the right operand from the left operand. |
| * | Arithmetic | Multiplies the operands. |
| / | Arithmetic | Divides the left opernad by the right operand. |
| % | Arithmetic | Divides the left operand by the right operand and calculates the remainder. |
| + | String | Combines the operands into a single string. |
| ++ | Unary | Increases the value of the supplied operand by one. |
| - | Unary | Negates the value of the operand. |
| -- | Unary | Decreases the value of the supplied operand by one. |
| && | Logical | Evaluates to true when both operands are true. |
| || | Logical | Evaluates to true when either operand is true. |
| ! | Logical | Evaluates to true if the operand is false, and to false if the operand is true. |
| == | Comparison | Evaluates to true if the operands are equal. |
| != | Comparison | Evaluates to true if the operands are not equal. |
| > | Comparison | Evaluates to true if the left operand is greater than the right operand. |
| < | Comparison | Evaluates to true if the left operand is less than the right operand. |
| >= | Comparison | Evaluates to true if the left operand is greater than or equal to the right operand. |
| <= | Comparison | Evaluates to true if the left operand is less than or equal to th right operand. |
A good understanding of these operators and their use in basic expressions will provide the foundation for the bulk of your JavaScript programming.
Defining Functions
A function is a specific block of code designed to do a certain task. You may create functions to do tasks appropriate to your application, or you can use one of the many built-in JavaScript functions.
A function is defined by using the keyword "function" followed by the name you wish to give to the function. The following is a very simple example:
function welcomeMessage()
{  alert("Welcome to My Website!");
} |
Note the parentheses after the function name. In this example they contain nothing, this function has no parameters. Another function, however, may have parameters. These are values, passed to the function, that the function may process.
function avgVal(num1, num2)
{  var num3;
  num3 = num1 + num2 / 2;
  return num3;
} |
The function avgVal takes 2 parameters, num1 and num2 and returns the average of the two numbers. A very simple function, but it demonstrates the use of parameters and the use of the return keyword to assign the value back to the function.
Calling Functions
alert(avgVal(12, 6)); |
The line, above, which calls the avgVal function will now display a message box with the number "9" in it. It should be observed that functions do nothing until they are called from elsewhere in your program code.
Operator Precedence
Each type of operator has a precedence which determines the order of evaluation. For example, in the expression 10 / 5 + 2 the division takes precedence over the addition so the expression evaluates to 4.
| Operator Precedence | |
|---|---|
| Operator | Description |
| () | Parentheses |
| ++ or -- | Unary increment or decrement |
| * or / | Multiplication or division |
| + or - | Addition or Subtraction |
Local and Global Variables
Variables in JavaScript have a certain scope, an area of code within which they are valid. This scope is determined by where the variable is declared. A variable declared within a function will be local to that function. It will be valid and available only to code that is also in the function. A variable declared outside any function will be global and available to the code in all functions.
<SCRIPT LANGUAGE="JavaScript"> <!-- var myGlobal = 20; function myOne() {var myLocal = 10; alert(myLocal * myGlobal); } function myTwo() { alert(myLocal * myGlobal); } //--> </SCRIPT> |
if the function myOne is called, a message box will be displayed with the value 200, but if function myTwo is called, a message box will be displayed with the value 0. This is because within the scope of the function myTwo, the variable myLocal does not exist and so will evaluate to zero.
User Events and Event Handlers
User events are actions performed by a visitor to your Web site. An Event Handler is the JavaScript code that will respond to the action.
There are a number of events that can be handled by JavaScript event handlers, and these apply to different elements on the page.
For example, the Load event occurs when a Web page is first loaded by the browser, the onLoad event handler can respond to this.
<BODY onLoad="welcomeMessage();"> |
The above line of code utilises the earlier function example to display a message box when the Web page is loaded.
JavaScript - Controlling Program Flow
If Statement
The "If" statement is, perhaps, the most basic decision making statement in the program flow of any application.
If (condition1)
{// Code to execute if condition1 is true}else if (condition2)
{// Code to execute if condition2 is true
}
else
{// Code to execute if neither condition1 or condition2 are true
} |
The condition is any expression that evaluates to true or false. The parentheses are required and a semi-colon does not terminate the line.
While Statement
The "While" statement is a loop statement which will execute repeatedly for as long as the condition evaluates to true.
while (condition)
{  // Code to execute while condition is true
} |
If condition never evaluates to false the loop will never end and your program will, effectively, hang.
Do Statement
Also referred to as a do...while statement, which is probably more accurate. It is a variation on the "While" statement that checks the condition at the end of the loop.
do
{
  // Code to execute once and then  // repeatedly while condition is true
}while (condition) |
Checking the condition at the end of the loop ensures that the code within the loop is always executed at least once.
For Statement
Those of you familiar with the Basic programming language may know this as a For...Next statement. It fulfils the same action, that of iterating through a section of code with a set number of values.
for (i=0; i<4; i++){  // Code to execute for each iteration
} |
The values after "For" need a little explanation. I like to think of the three values as Initial. Condition and Action. In the first expression i=0 the variable i is set to the value 0, the second expression tests that variable for being less than 4, the third expression increment that variable i. The code will be executed four times when i holds the values 0, 1, 2, & 3.
Switch Statement
This can be thought of as a multiple "If" statement. The variable supplied to the switch is tested for comparison against one or more values.
switch (testValue)
{
case "Sam":
  alert("Hello User");
case "Ram":
  alert("Hello User");
case "Mam":
  alert("Hello User");
default:
  alert("Hi No-One");
} |
If a match is found, the code between the matching "case" and the following "case" will be executed.
Loop Control Commands
The commands "continue" and "break" can be placed anywhere inside a block of loop code. "continue" will move the execution back to the top of the loop, while "break" exits the loop. "continue" can only be used in a "for" or a "while" loop.
JavaScript Object Model
Object Hierarchy Model
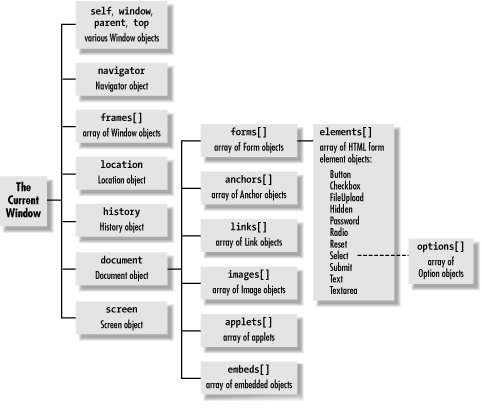
A good understanding of this hierarchy and the concept of containership will be of great benefit as we continue with this section. Containership means that one object is contained in, or belongs to, another higher object.
Window Object
The window object is, perhaps, the object you will use the most. It is also the default object, which means that when referencing it's contained objects and methods, you do not need to specify the window object itself. For example: alert() is a window method, if window was not the default object you would need to type window.alert(). The window object has a number of properties, methods and event handlers. Some of these properties are detailed below:
| The Window Object | |
|---|---|
| Property | Description |
| frames | An Array object that holds information on the frames in the window |
| parent | A string value containing the name of the parent window |
| name | A string value containing the name of this window |
| length | An integer value containing the number, or count, of the frames referenced in the frames Array |
| status | The status bar text |
| defaultStatus | Default status bar text |
| self | A string value containing the name of the current window |
| window | An alternative name for self or name |
| top | A string value containing the name of the topmost window |
Window Open() Method
The window open method has three parameters, URL, name and Feature List. For example you may have a line like: newWindow = open("test.html", "myWindow", "width=250, height=250, toolbar=no").
newWindow is a variable that holds a pointer to the new window object.
test.html is the page to be opened in the new window. An empty string for this parameter will open a blank window, which may be populated with the document.write() method.
myWindow is the name of the new window. This is not the name used for scripting, but can be used as the target attribute for hyperlinks and forms.
The third parameter is the feature list which can be any of the values shown below:
| open() Feature List Values | |
|---|---|
| Attribute | Description |
| toolbar | Creates the standard toolbar |
| location | Creates the location entry field |
| status | Creates the status bar |
| menubar | Creates the menu at the top of the window |
| scrollbars | Creates scroll bars, when required should the document be larger than the window |
| resizable | Enables window resizing by the user |
| width | Specifies the window width in pixels |
| height | Specifies the window height in pixels |
| top | Specifies the top Y coordinate where the window will be opened. (Not supported in all browser versions) |
| left | Specifies the left X coordinate where the window will be opened. (Not supported in all browser versions) |
The value of these attributes is 0/1 or yes/no except the width and height attributes where you specify the number of pixels.
Dot Notation
In the JavaScript Object Hierarchy Model, objects are divided into three groups: browser objects, language objects and form field objects. These objects exist at different levels in the hierarchy and the objects will form a Parent.Child relationship. This dot notation is used to reference any specific object within the hierarchy.
An example using the dot notation would be a line: myWindow.document.bgcolor="lightgrey";
With Statement
This is a very useful feature to minimise the amount of code produced, and improve the readability of the code:
For example the following code:
myWindow.document.open();
myWindow.document.bgcolor = "lightblue";
myWindow.document.fgcolor = "white";
myWindow.document.write("<H2>Hello World!</H2>");
myWindow.document.close(); |
can be rewritten as
with (myWindow.document)
{
   open();
   bgcolor = "lightblue";
   fgcolor = "white";
   write("<H2>Hello World!</H2>");
   close();
} |
Much simpler and much cleaner, I'm sure you will agree. Any object can be treated in this way.
JavaScript - Browser Objects
Document Object
The window object can be considered as the browser, while the document can be considered as the page you see in the browser. The document object is subordinate to the window object. The document object is created by the <BODY></BODY> HTML tags. I wasn't going to spend too much time discussing the document properties but, having experimented with a few, they are worth a mention.
| Document Object Properties | |
|---|---|
| Property | Description |
| alinkColor | The colour of an active link |
| vlinkColor | The colour of a visited link |
| bgColor | Background colour of the document |
| fgColor | The text, or foreground, color of the document |
| location | the current URL |
| lastModified | the date and time the document was last modified |
| title | the text between the <TITLE> and </TITLE> tags |
| forms | An Array containing references to each form in the document |
alinkColor and vlinkColor are useful to customise the look of your page, but be careful with your choice of colour. Remember most users are used to blue links. I, personally, prefer CSS for this type of customisation. I experimented a little with the location property and discovered it is writeable, and setting it to a valid URL will displayed that page, in place of the current page!
| Document Object Methods | |
|---|---|
| Method | Description |
| write(string) | Writes the text to the document |
| open() | Prepares the document to receive data from a write, or data, stream |
| writeln() | Like write() but appends a carriage return |
| close() | Closes the data stream |
Both the write() method and the open() method are worth discussing. write() exhibits different behaviour when writing to the current document than it does when writing to a popup window document.
Image Object
In JavaScript images can be accessed through the images Array. The image object is subordinate to the document object in the hierarchy. The image object has properties and event handlers, but does not have any methods.
| The image Object Properties | |
|---|---|
| Property | Description |
| src | The URL of the image, this is a required parameter |
| height | The height of the displayed image in pixels |
| width | The width of the displayed image in pixels |
| length | The number of elements in the images array |
| complete | True if the image has finished loading |
| hspace | the border space to the laft and right of the image in pixels |
| vspace | the border space above and below the image in pixels |
| lowsrc | The URL for a low-bandwidth image |
Event handlers supported by the image object include onLoad, onError, onAbort, onClick, onMouseOver and onMouseOut.
History Object
The history object holds a list of the pages visited, in the current session, with the browser. The history object is subordinate to the window object in the hierarchy. There are no properties or event handlers for this object.
| The history Object Methods | |
|---|---|
| Method | Description |
| back() | Changes the displayed page to the previous page in the history list. |
| forward() | Changes the displayed page to the subsequent page in the history list. |
| go(x) | If x is an integer, the browser will move the displayed page back x number of pages in the history list. If x is a string the displayed page will change to the entry in the history list that matches x. |
Location Object
The location object allows a URL to be specified, or allows the URL to be read. Furthermore, the properties of the location object split out the component parts of the URL. The location object is subordinate to the window object in the hierarchy.
A URL can be represented as:
protocol://hostname:port/pathname?search or protocol://hostname:port/pathname#
| The location Object Properties | |
|---|---|
| Property | Description |
| href | Specifies the partial or full URL of a file or site |
| protocol | Specifies the protocol currently in use |
| host | Refers to the hostname:port portion of the URL |
| hostname | Specifies the hostname of the URL |
| port | Specifies the port number used for access, if a port number is provided |
| pathname | Indicates the path to the target file |
| search | Return the text following the ? character if a search string is present |
| hash | Specifies the internal link anchor name, which follows the hash symbol in the URL |
Navigator Object
The navigator object can return information about the browser and version in use. The navigator object is a top-level object in the hierarchy.
| The navigator Object Properties | |
|---|---|
| Property | Description |
| appCodeName | String value containing the code name of the client |
| AppName | Array object containing the name of the client |
| AppVersion | String value containing the version information for the client |
| language | A code indicating the language of the client browser |
| mimeTypes | An array repesenting all of the MIME types suppoerted by the browser |
| platform | Identifies the operating system for which the browser was compiled |
| plugins | An array identifying all of the pluins installed on the browser |
| userAgent | String value containing the complete value of the user-agent header sent in the HTTP request |
Methods supported by the navigator object are: JavaEnabled(), preference() and taintEnabled().
Data tainting is a term I hadn't come across before, so I did a little research. It is a method of securing data to stop it being passed to the server without the user's permission. It is not supported in Internet Explorer and was removed in JavaScript 1.2
JavaScript - Language Objects
The Language objects are treated slightly differently to other JavaScript objects. If you examine the hierarchy model closely you will notice that Language object names all start with a capital letter. So we have: Array, Date, Math, String, Function, Boolean and Number. As you know, JavaScript is case-sensitive so this is important to be aware of.
String Object
A String is a series of characters, generally letters but it can contain any characters. There is one special character that cannot appear in a string, as it stands, and this is "\", the backslash, which is probably more correctly referred to, in this context, as the ESC character. This is used to create escape sequences to represent special characters in a string.
| JavaScript Escape Sequences | |
|---|---|
| Characters | Represents |
| \b | Backspace |
| \f | Form feed |
| \n | New line |
| \t | Tab |
| \r | Carriage return |
| \" | Double quote |
| \' | Single quote |
| \\ | Backslash |
For example: document.write("<TITLE>My Home Page</TITLE>\n"); would write the line, but ends it with the new line character. String methods, and other language methods, are subordinates of the String object, so they employ the same dot notation to invoke them. If variable strVar contains a string then strVar.bold() will make it appear as bold text. What it actually does, is wrap the string in the <B> and </B> tags. String methods can be applied equally to a string variable or to a literal string. There are a large number of String methods, here are just a few that are, perhaps, more commonplace:
| String Object Methods | |
|---|---|
| Method | Description |
| link("URL") | Uses the String value as the link text to URL |
| fontcolor("color") | Sets the text colour of the string |
| bold() | uses bold face |
| toUpperCase() | converts string to upper case characters |
| length | returns the number of characters in String |
String Evaluation Methods
I think that this paragraph may have been better titled as string manipulation. We shall look at finding specific characters within a string and extracting portions of a string. The method "length" returns the number of characters in the string. indexOf(SearchText, StartPosn) finds the first occurrence of SearchText in the string. lastIndexOf(SearchText, EndPosn) finds the last occurrence of SearchText in the string. lastIndexOf uses an EndPosn as it is searching the string in reverse. substring(StartPosn, EndPosn) returns a portion of the string. It should be remembered that the numbering of character positions in the string begins at 0 (zero). charAt(Posn) returns a single character.
Array Object
An Array can be thought of as a collection of variables that can be manipulated as one. JavaScript arrays are zero-based which means the first element number is 0.
var season = new Array();
Week[0] = "Sunday";
season[1] = "Monday";
season[2] = "Tuesday";
season[3] = "Wednesday";
season[4] = "Thursday";
season[5] = "Friday";
season[6] = "Saturday";
|
Arrays are a fundamental part of most programming languages and scripts. Arrays are simply an ordered stack of data items. Each element of the array can store its own data, just like a variable, thus you can say arrays are collections of variables. Items can be added and removed from the array at any time, also their value can be changed easily. One other feature of the arrays, which is specific to JavaScript is that the elements in the array can be of different types. For example in an array you can have both a string and an integer.
Using arrays, you can store multiple values under a single name. Instead of using a separate variable for each item, you can use one array to hold all of them.
Creating Arrays
There are a few different ways to create an array. The old way of creating arrays to involve the Array() constructor. JavaScript arrays are dynamic, so you can declare an array and do not pass any arguments with the Array() constructor. In this case you will create an empty array with no elements.
<script type="text/javascript">
//We initialize the array using the array() constructor.
var first_array = new Array();

first_array[0] = "This is an day one";
first_array[1] = 2;
first_array[2] = "JavaScript - Topic";
first_array[3] = 5;
first_array[4] = 9;

var count=0;

//Let's print out the elements of the array.
for (count=0; counter<first_array.length; counter++)
   document.write(first_array[count] + "<br>");
</script>
To declare an array with the specified number of elements you should pass a single integer as an argument. If you pass more than one argument then the number of elements will be equal to the number of data values specified. If you specify numbers or true/false values inside the array then the type of variables will be numeric or Boolean instead of string. Array's elements are accessed using their index, which starts from 0.
<script type="text/javascript">
//We declare the first array and pass a single integer as an argument..
var months = new Array(5);
Months[0] = "January";
Months[1] = "Feburary";
Months[2] = "March";
Months[3] = "April";
Months[4] = "May";
//Now we declare the second array and pass 8 arguments.

//This technique does not work in JavaScript 1.2.
var stationary = new Array("Pencil", 2.0, "Notebook", 1.5, "Rubber", 0.55, "Sharpner", 1.00);
var count=0;
document.write("<h1>Elements of the first array:</h1>");
for (count=0; count<cars.length; count++)
   document.write(months[count] + "<br>");
count=0;

document.write("<h1>Elements of the second array:</h1>");

for (count=0; count<stationary .length; count++) {

   if (counter % 2 == 0) {
  document.write(stationary [count] + " costs ");
   }

   else {
  document.write(stationary [count] + "<br>");
   }
}
</script>
Associative Arraysrrays
Associative arrays are arrays that allow you to call the array element you need using a string rather than a number, which is often easier to remember. The downside is that these aren't as useful in a loop because they do not use numbers as the index value. Have a look at the following example:
<script type="text/javascript">
var first_array = new Array();
first_array["key1"] = "the first element";
first_array["key2"] = "the second element";
var second_array  = new Array();

second_array["key3"] = "this is the first element of the second array";

second_array["key4"] = "this is the second element of the second array";
document.write(first_array["key1"] + "<br>");   //prints "the first element."

document.write(second_array["key3"] + "<br>");  //prints "the first element of the second array"

document.write(first_array["key2"] + "<br>");   //prints "the second element"

document.write(second_array["key4"] + "<br>");  //prints "this is the second element of the second array"

</script>
Because the indices in this associative array are not numbers, we cannot use a simple counter in a for loop to work with the array. The way to iterate over the items in an associate array is to use the for (value in array) construct, allowing you to access each item's value via array[value]. Have a look at the example:
<script type="text/javascript">
//We initialize the array using the Array() constructor.
//Note that for readability one can spread the argument over several lines.
var days var stationary = new Array ();

stationary_shop["pencil"] = "5.00";
stationary_shop["pen"] = "4.00";

stationary_shop["ink"] = "2.00";
//let's print out the headers to our tabler />
document.write("<table border=\"1\" cellpadding=\"5\">");
document.document.write("<tr><th>Stationary</th><th>Cost</th></tr>");
//Now we start the for loop using the variable stationary to hold our key.
for ( var item  in stationary_shop) //print the values into a table cell for each iterationr />
 doc document.write( "<tr><td>" + item + "</td><td>" + stationary_shop[item] + "</td></tr>");

//finally close the tabler />
document.write ("</table>");

</scri</script>
Date Object
The Date object holds date and time information and allows this to be manipulated. There are a large number of built-in methods for the Date object, below is but a small sample:
| Date Object Methods | |
|---|---|
| Method | Description |
| getDate() | Returns the day number. 1 to 31 |
| setDate(value) | Sets the day number |
| getHours() | Returns the hour number. 0 to 23 |
| setHours(value) | Set the Hour number |
The Date object also has a timer method allowing a function to be called repeatedly at a defined interval. The setTimeout and clearTimeout methods are used to control this interval.
Math Object
The Math object permits the calculation of a number of mathematical formulae or functions. It has a number of properties and methods. These cover sine, cosine, tangent, etc. It will also round numbers up or down, and return values such as Pi JavaScript has many intrinsic objects that define it as a language. This article covers some of the most commonly used objects and provides a basic understanding of what the functions are and how to use them.
Number
The JavaScript Number object is a wrapper for numeric values. You can use it in combination with the new keyword and set it to a variable to be used later in JavaScript code:
var myNumber = new Number(numeric value);
Alternatively, you can create a Number object simply by setting a variable to a numeric value. This variable will then have access to the properties and methods available to the object.
In addition to storing numeric values, the Number object includes various properties and methods for manipulating or retrieving information about numbers. All of the properties available to the Number object are read-only constants, meaning that their values always remain the same and cannot be changed. Four properties are included in the Number object:
MAX_VALUEMIN_VALUENEGATIVE_INFINITYPOSITIVE_INFINITY
The MAX_VALUE property returns the value 1.7976931348623157e+308, which is the largest number JavaScript can handle:
document.write(Number.MAX_VALUE);
// Result is: 1.7976931348623157e+308
Alternatively, using MIN_VALUE returns the value 5e-324, which is the smallest number possible in JavaScript:
document.write(Number.MIN_VALUE);
// Result is: 5e-324
NEGATIVE_INFINITY is the largest negative number JavaScript can handle, represented as -Infinity:
document.write(Number.NEGATIVE_INFINITY);
// Result is: -Infinity
The POSITIVE_INFINITY property is anything larger than MAX_VALUE and is represented as Infinity:
document.write(Number.POSITIVE_INFINITY);
// Result is: Infinity
The Number object also has methods that you can use to format or convert numeric values. The methods are:
toExponentialtoFixedtoPrecisiontoStringvalueOf
Each method essentially does exactly as it is named—for example, the toExponential method returns a string representation of a number in exponential form. The uniqueness of each method is in the arguments it excepts. The toExponential method has an optional argument that can be used to set how many significant digits to use, the toFixed method determines the post-decimal precision based on the argument passed, and the toPrecision method determines the significant digits to display based on the argument passed.
Each object in JavaScript includes a toString and valueOf method, so those methods aren't covered in the proceeding sections. The toString method returns a string representation of a number (in this case), but in other objects, it returns a string representation of that object type. The valueOf method returns the primitive value of the object type that calls it—in this case, the Number object.
The Number object alone might not seem terribly powerful, but it is an essential part of any programming language, and JavaScript is no exception. The JavaScript Number object provides the foundation for any mathematical procedures, which is essentially the foundation of all programming languages.
Boolean
The Boolean object is necessary when attempting to create any sort of logic in JavaScript. A Boolean is an object that represents a true or a false value. The Boolean object has a number of values that qualify as a value equal to false (0 , -0, null, or "" [an empty string]), undefined (NaN), and of course, false. All other Boolean values qualify as a value equal to true. The object can be instantiated using the new keyword but is most often a variable set to a true or false value:
var myBoolean = true;
The Boolean object includes the toString and valueOf methods, although it's unlikely that you will need to use them. The Boolean object is most commonly used for simple evaluation of a true or false value in conditional statements. The combination of Booleans and conditional statements provides a way to create logic using JavaScript. Examples of such conditional statements are the if, if...else, if...else...if, and switch statements. When combined with a conditional statement, you can use Booleans to determine a result based on the conditions that you script. Listing 1 shows a simple example of a conditional statement combined with a Boolean.
Listing 1. A conditional statement combined with a Boolean
var myBoolean = true;
if(myBoolean == true) {
// If the condition evaluates to true
}
else {
// If the condition evaluates to false
}
It goes without saying that the Boolean object is an extremely important part of JavaScript. Without a Boolean object, there wouldn't be anything to evaluate within conditional statements.
String
The JavaScript String object is a wrapper for text values. In addition to storing text, the String object includes a property and various methods to manipulate or gather information about text. Like the Boolean object, the String object doesn't need to be instantiated to be used—for example, you can set a variable to a string, and then all of the String object properties or methods will become available to that variable:
var myString = "My string";
The String object only has one property—length—which is read only. You use the length property to return the length of a string only: You cannot change it externally. The code that follows provides an example using the length property to determine the number of characters in a string:
var myString = "My string";
document.write(myString.length);
// Results in a numeric value of 9
The result of this code is 9, because the space between the two words is also counted as a character.
There are quite a few methods in the String object that you can use to manipulate and gather information about text. The following is a list of the available methods:
- charAt
- charCodeAt
- concat
- fromCharCode
- indexOf
- lastIndexOf
- match
- replace
- search
- slice
- split
- substr
- substring
- toLowerCase
- toUpperCase
The chartAt method can be used to retrieve a specific character based on an index that you pass as an argument. The code that follows provides an example of how to return the first character of a string:
var myString = "My string";
document.write(myString.chartAt(0);
// Results in M
If you need the opposite result, there are a couple of methods that return the index of a specified character or set of characters in a string rather than returning a character using an index. These methods are indexOf and lastIndexOf, both of which include two parameters: searchString and start. The searchString parameter is the starting index, and the start parameter tells the method where to begin the search. The difference between these two methods is that indexOf returns the first occurrence, and lastIndexOf returns the last occurrence.
The charCodeAt method is similar to charAt: The only difference is that it returns the Unicode character. Another Unicode-related method that the String object includes is fromCharCode, which converts Unicode to characters.
If you're looking to combine strings, you can either add them together using the plus sign (+) or you can more appropriately use the concat method. This method accepts an unlimited number of string arguments, joins them, and returns the combined result as a new string. Listing 2 shows an example of how to combine multiple strings as one using concat instance.
Listing 2. Combining multiple strings using the concat method
var myString1 = "My";
var myString2 = " ";
var myString3 = "string";
document.write(myString.concat(myString1, myString2, myString3);
// Results in "My String"
There is also a group of String methods that accept a regular expression as an argument to find or modify a string. These include the match, replace, and search methods. The match method uses the regular expression to search a specific string and returns all matches. The replace method actually accepts a substring or a regular expression and a replacement string as its second parameter, replaces all matches with the replacement string, and returns the updated string. The last of these methods is the search method, which searches for a match of a regular expression and returns its position.
When it's necessary to alter a string, a number of methods come in handy. The first is the slice method, which extracts and returns part of a string based on an index or the combination of a beginning and ending index. Another such method is the split method. The split method splits a string into an array of substrings wherever the separator argument is found. For example, if a comma (,) is passed as an argument, the string will be split at every comma into a new substring. The next methods that can alter a string are the substr method, which extracts characters from a string based on the start position and length specified as arguments, and the substring method, which extracts characters from a string based on the two indices specified as arguments. The final methods that can alter a string are toLowerCase and toUpperCase, which convert the characters in a string to lowercase and
uppercase letters, respectively. These methods are useful when comparing string values, as strings can sometimes have inconsistencies in case. These methods ensure that you're comparing the value, not the case.
Date
The JavaScript Date object provides a way to work with dates and times. You can instantiate it in a number of different ways depending on the desired results. For example, you can instantiate it with no arguments:
var myDate = new Date();
Or pass milliseconds as an argument:
var myDate = new Date(milliseconds);
You can pass a date string as an argument:
var myDate = new Date(dateString);
Or you can pass multiple arguments to create a complete date:
var myDate = new Date(year, month, day, hours, minutes, seconds, milliseconds);
In addition, several methods are available to the Date object that you can use once the object has been instantiated. Most of the available methods revolve around getting a specific portion of the current time. The following methods are the getter methods available to the Date object:
- getDate
- getDay
- getFullYear
- getHours
- getMilliseconds
- getMinutes
- getMonth
- getSeconds
- getTime
- getTimezoneOffset
As you can see, each method is fairly straightforward in the values it returns. The difference is in the value range returned. For example, the getDate method returns a numeric day of the month value ranging from 1 to 31; the getDay method returns a numeric day of the week value ranging from 0 to 6; the getHours method returns a numeric hour value ranging from 0 to 23; and the getMilliseconds function returns a numeric milliseconds value ranging from 0 to 999. The getMinutes and getSeconds methods return a value ranging from 0 and 59, and the getMonth method returns a numeric month value ranging from 0 to 11. The only unique methods in this list are getTime and getTimezoneOffset. The getTime method returns the number of milliseconds since 1/1/1970 at 12 a.m., while the getTimezoneOffset method returns the difference in minutes between GMT and
local time.
For most of the getter methods, there is also a setter method that accepts a numeric argument in the corresponding value range. The setter methods are as follows:
- setDate
- setFullYear
- setHours
- setMilliseconds
- setMinutes
- setMonth
- setSeconds
- setTime
For all the getter methods listed above, there are matching methods that return the same value ranges, except that the values are set in universal time. These methods are:
- getUTCDate
- getUTCDay
- getUTCFullYear
- getUTCHours
- getUTCMilliseconds
- getUTCMinutes
- getUTCMonth
- getUTCSeconds
Of course, as there are setter methods for all of the original getter methods, there are also the same in universal time. These methods are:
- setUTCDate
- setUTCFullYear
- setUTCHours
- setUTCMilliseconds
- setUTCMinutes
- setUTCMonth
- setUTCSeconds
As mentioned at the beginning of this article, I don't provide much information about the toString method, but there are a number of methods in the Date object that convert dates to a string and are worthy of mention. In some cases, it's necessary to convert a date or portion of a date into a string—for example, if you're appending it to a string or using it in a comparison statement. Several methods available to the Date object that provide slightly different methods that convert it to a string, including:
- toDateString
- toLocaleDateString
- toLocaleTimeString
- toLocaleString
- toTimeString
- toUTCString
The toDateString method converts a date to a string:
var myDate = new Date();
document.write(myDate.toDateString());
toDateString returns the current date in the format Tue Jul 19 2011.
The toTimeString method converts the time from the Date object it to a string:
var myDate = new Date();
document.write(myDate.toTimeString());
toTimeString returns the time as a string in the format 23:00:00 GMT-0700 (MST).
The final method that converts a date to a string is toUTCString, which converts a date to a string in universal time.
A few methods convert a date to a string using locale, but they are not supported by Google Chrome as the time of writing. The unsupported methods are toLocaleDateString, toLocaleTimeString, and toLocaleString.
The JavaScript Date object may seem simple at first glance, but it can be more than just a useful way to display the current date. It depends on the functionality you are inspired to create. For example, the Date object is the basis for creating a countdown ticker or any other time-related functionality.
Array
The JavaScript Array object is a variable on steroids: You use it to store multiple values in one variable at one time, and it has many methods that allow you to manipulate or gather information about the values it stores. Although the Array object doesn't discriminate about the value types, it's good practice to use the same type of values in a single array. So, for example, it's not good practice to use numbers and strings in the same array. All of the properties available to the Array object are read only, meaning that their value cannot be changed externally.
The only property available to the Array object is length. This property returns the number of elements in an array and is often used when iterating values in an array using a loop:
var myArray = new Array(1, 2, 3);
for(var i=0; i<myArray.length; i++) {
document.write(myArray[i]);
}
A number of methods are available to the Array object, and you can use a variety of methods to add and remove elements to and from an array. These methods include pop, push, shift, and unshift. The pop and shift methods both remove elements from an array. The pop method removes and returns the last element in an array, while the shift method removes and returns the first element in an array. The opposite functionality can be achieved with the push and unshift methods, which add elements to an array. The push method adds elements to the end of an array as new elements and returns the new length, while the unshift method adds elements to the front of an array and returns the new length.
Sorting an array in JavaScript is possible with two methods, one of which is actually named sort. The other is reverse. The sort method is complex in that it sorts an array based on an optional sort function. The sort function can be any custom function that you write. The reverse method is not as complex as sort, although it does modify the order of the elements in an array by reversing them.
Indices are important when dealing with arrays, as they define the location of each and every element in an array. Two methods are able to alter a string based on an index: slice and splice. The slice method accepts an index or the combination of the starting and ending index as parameters, and then extracts and returns part of an array as a new array based on the arguments. The splice method includes index, length, and unlimited element parameters. The method adds elements to an array based on the specified index, removes elements from an array based on the specified index, or adds and removes elements to and from an array based on the specified index. There is also a method that can return an index based on a matching value: indexOf. You can then use this index to slice or splice an array.
The key to writing good code in any programming language is writing well-organized code. As you can see from its various methods, the JavaScript Array object is a powerful way to organize data and create complex functionality.
Math
The JavaScript Math object is used to perform mathematical functions. It cannot be instantiated: You simply use the Math object as is and call properties and methods from it without any instantiation:
var pi = Math.PI;
The Math object has many properties and methods that provide mathematical functionality to JavaScript. All of the Math properties are read-only constants and include the following:
- E
- LN2
- LN10
- LOG2E
- LOG10E
- PI
- SQRT1_2
- SQRT2
The E property returns the value of the base of natural logarithms, or Euler's number. This value is the unique real number, named after Leonhard Euler. Calling the E property results in the number 2.718281828459045. Two other properties are also used to return natural logarithms: LN2 and LN10. The LN2 property returns the value of the natural logarithm of 2, while the LN10 property returns the value of the natural logarithm of 10. The LOG2E and LOG10E properties could be used to return the base-2 or base-10 logarithm of E. The result of LOG2E is 1.4426950408889633, while the result of LOG10E is 0.4342944819032518. You won't need most of these properties often, unless of course you are building a calculator or other math-intensive project. However, PI and square root are a bit more common. The PI method
returns the ratio of a circles circumference to its diameter. Two properties return square root values: SQRT1_2 and SQRT2. The first returns the square root of 0.5, while SQRT2 returns the square root of 2.
In addition to these properties, there are several methods that you can use to return different values of a number. Each of these methods accepts numeric values and returns a value based on the method name. Unfortunately, the method names are not always self-explanatory:
abs. The absolute value of a numberacos. Arccosineasin. Arcsineatan. Arctangentatan2. The arctangent of multiple numberscos. Cosineexp. Exlog. A number's natural logarithmpow. The value of x to the power of ysin. Sinesqrt. Square roottan. The tangent of an angle
Three methods can be used to round numbers in JavaScript: ceil, floor, and round. The ceil method returns a number's upward-rounded value. This method is useful when you need to round a number up to the nearest whole number. The floor method provides the opposite functionality of ceil: It returns the downward-rounded value of a number. This method is useful when you need to round a number down to the nearest whole number. The round method provides normal rounding functionality, rounding a number up or down based on any existing decimals.
The final three methods included in the Math object are max, min, and random. The max method accepts multiple numeric arguments and returns the highest value, while the min method accepts multiple numeric arguments and returns the lowest value. These methods can be useful when comparing variables that have numeric values, especially when you do not already know what the numeric values are. You use the random method to return a random number between 0 and 1. You can use this method for many reasons, such as displaying a random image on the home page of a website or to return a random number that could be used as an index for an array that contained file paths for images. The random image file path that was selected from the array could then be used to write that image to an HTML <img> tag.
Any interactive web site has form input - a place where the users input different kind of information. This data is passed to ASP script, or some other technology and if the data contains an error, there will be a delay before the information travels over the Internet to the server, is examined on the server, and then returns to the user along with an error message.
If you run a validation of the user’s form input before the form is submitted, there will be no wait time and redundant load on the server. "Bad data" are already filtered out when input is passed to the server-based program. It also allows to simplify server-based program.
Client side form validation usually done with javascript. For the majority of your users, JavaScript form validation will save a lot of time up front, but double-checking the data on the server remains necessary, in case the user has turned JavaScript off.
Form data that typically are checked by a JavaScript could be:
validateFormOnSubmit ( )
This is a main function that calls a series of subfunctions, each of which checks a single form element for compliance. If the element complies than sufunction returns an empty string. Otherwise it returns a message describing the error and highlight appropriate element with yellow.
function validateFormOnSubmit(theForm) {
var reason = "";

  reason += validateUsername(theForm.username);
  reason += validatePassword(theForm.pwd);
  reason += validateEmail(theForm.email);
  reason += validatePhone(theForm.phone);
  reason += validateEmpty(theForm.from);

  if (reason != "") {
    alert("Some fields need correction:\n" + reason);
    return false;
  }

  return true;
}
The function below checks if a required field has been left empty. If the required field is blank, we return the error string to the main function. If it’s not blank, the function returns an empty string.
function validateEmpty(fld) {
    var error = "";


    if (fld.value.length == 0) {
    fld.style.background = 'Yellow';
    error = "The required field has not been filled in.\n"
    } else {
    fld.style.background = 'White';
    }
    return error;

}
The function below checks if the user entered anything at all in the username field. If it’s not blank, we check the length of the string and permit only usernames that are between 5 and 15 characters. Next, we use the JavaScript regular expression /\W/ to forbid illegal characters from appearing in usernames. We want to allow only letters, numbers and underscopes.
function validateUsername(fld) {
    var error = "";
    var illegalChars = /\W/; // allow letters, numbers, and underscores

    if (fld.value == "") {
    fld.style.background = 'Yellow';
    error = "You didn't enter a username.\n";
    } else if ((fld.value.length < 5) || (fld.value.length > 15)) {
    fld.style.background = 'Yellow';
    error = "The username is the wrong length.\n";
    } else if (illegalChars.test(fld.value)) {
    fld.style.background = 'Yellow';
    error = "The username contains illegal characters.\n";
    } else {
    fld.style.background = 'White';
    }

    return error;
}
The function below checks the password field for blankness and allow only letters and numbers - no underscopes this time. So we should use a new regular expression to forbid underscopes. This one /[\W_]/ allow only letters and numbers. Next, we want to permit only passwords that contain letters and at least one numeral. For that we use the seacrh() method and two more regular expressions: /(a-z)+/ and /(0-9)/.
function validatePassword(fld) {
    var error = "";
    var illegalChars = /[\W_]/; // allow only letters and numbers

    if (fld.value == "") {
    fld.style.background = 'Yellow';
    error = "You didn't enter a password.\n";
    } else if ((fld.value.length < 7) || (fld.value.length > 15)) {
    error = "The password is the wrong length. \n";
    fld.style.background = 'Yellow';
    } else if (illegalChars.test(fld.value)) {
    error = "The password contains illegal characters.\n";
    fld.style.background = 'Yellow';
    } else if (!((fld.value.search(/(a-z)+/)) && (fld.value.search(/(0-9)+/)))) {
    error = "The password must contain at least one numeral.\n";
    fld.style.background = 'Yellow';
    } else {
    fld.style.background = 'White';
    }
   return error;
}
Next we want to see if the email address the user entered is real. This means that the input data must contain at least an @ sign and a dot (.). Also, the @ must not be the first character of the email address, and the last dot must at least be one character after the @ sign.
At first we check if the user entered anything at all in the email field. Next, we use regular expression and the test() method to check the field for a compliance. Also we will use trim() function that will trim leading whitespace off the string. This won’t be perfect validation — it is possible to slip not compliant addresses by it — but it's normally good enough.
function trim(s)
{
  return s.replace(/^\s+|\s+$/, '');
}


function validateEmail(fld) {
    var error="";
    var tfld = trim(fld.value);    // value of field with whitespace trimmed off
    var emailFilter = /^[^@]+@[^@.]+\.[^@]*\w\w$/ ;
    var illegalChars= /[\(\)\<\>\,\;\:\\\"\[\]]/ ;


    if (fld.value == "") {
    fld.style.background = 'Yellow';
    error = "You didn't enter an email address.\n";
    } else if (!emailFilter.test(tfld)) {  //test email for illegal characters
    fld.style.background = 'Yellow';
    error = "Please enter a valid email address.\n";
    } else if (fld.value.match(illegalChars)) {
    fld.style.background = 'Yellow';
    error = "The email address contains illegal characters.\n";
    } else {
    fld.style.background = 'White';
    }
    return error;
}
The function below checks if the phone number is valid. At first we use regular expression and the replace() method to clear out any spacer characters. Next, we use the isNaN() function to check if the phone number contain only numbers. At last we check the length of the string and permit only phone numbers with 10 digits.
function validatePhone(fld) {
    var error = "";
    var stripped = fld.value.replace(/[\(\)\.\-\ ]/g, '');


   if (fld.value == "") {
    error = "You didn't enter a phone number.\n";
    fld.style.background = 'Yellow';
    } else if (isNaN(parseInt(stripped))) {
    error = "The phone number contains illegal characters.\n";
    fld.style.background = 'Yellow';
    } else if (!(stripped.length == 10)) {
    error = "The phone number is the wrong length. Make sure you included an area code.\n";
    fld.style.background = 'Yellow';
    }

    return error;
}
HTML Form
This script accompanies an HTML form. When the user clicks the Submit button on the form, the form data is sent to a JavaScript validation function that checks each field to make sure that it is in the appropriate format. The HTML form could look something like this:
<html> <head> <title>WebCheatSheet - JavaScript Tutorial</title> </head> <body> <h1>WebCheatSheet - JavaScript Tutorial</h1> <form name="demo" onsubmit="return validateFormOnSubmit(this)" action="test.htm"> <table summary="Demonstration form"> <tbody> <tr> <td><label for="username">Your user name:</label></td> <td><input name="username" size="35" maxlength="50" type="text"></td> </tr> <tr> <td><label for="pwd">Your password</label></td> <td><input name="pwd" size="35" maxlength="25" type="password"></td> </tr> <tr> <td><label for="email">Your email:</label></td> <td><input name="email" size="35" maxlength="30" type="text"></td> </tr> <tr> <td><label for="phone">Your telephone number:</label></td> <td><input name="phone" size="35" maxlength="25" type="text"></td> </tr> <tr> <td> <label for="from">Where are you :</label></td> <td><input name="from" size="35" maxlength="50" type="text"></td> </tr> <tr> <td> </td> <td><input name="Submit" value="Send" type="submit" ></td> <td> </td> </tr> </tbody> </table> </form> </body> </html>
Playing with Htnl Forms Using Javascript
First of all we want to create a simple script. The HTML-page shall contain two text-elements. The user has to write his name into the first and an e-mail address into the second element. You can enter anything into the form elements and then push the button. Also try to enter nothing and then push the button.
Concerning the first input element you will receive an error message when nothing is entered. Any input is seen as valid input. Of course, this does not prevent the user from entering any wrong name. The browser even accepts numbers. So if you enter '17' you will get 'Hi 17!'. So this might not be a good check. The second form is a little bit more sophisticated. Try to enter a simple string - your name for example. It won't work (unless you have a @ in your name...). The criteria for accepting the input as a valid e-mail address is the @. A single @ will do it - but this is certainly not very meaningful. Every Internet e-mail address contains a @ so it seems appropriate to check for a @ here.
What does the script for those two form elements and for the validating look like? Here it goes:
<html>
<head>
<script language="JavaScript">
<!-- Hide

function test1(form) {
if (form.text1.value == "")
alert("Please enter a string!")
else {
alert("Hi "+form.text1.value+"! Form input ok!");
}
}

function test2(form) {
if (form.text2.value == "" ||
form.text2.value.indexOf('@', 0) == -1)
alert("No valid e-mail address!");
else alert("OK!");
}
// -->
</script>
</head>

<body>
<form name="first">
Enter your name:<br>
<input type="text" name="text1">
<input type="button" name="button1" value="Test Input" onClick="test1(this.form)">
<P>
Enter your e-mail address:<br>
<input type="text" name="text2">
<input type="button" name="button2" value="Test Input" onClick="test2(this.form)">
</body>
</html>
First have a look at the HTML-code in the body-section. We just create two text elements and two buttons. The buttons call the functions test1(...) or test2(...) depending on which button is pressed. We pass this.form to the functions in order to be able to address the right elements in the functions later on. The function test1(form) tests if the string is empty. This is done via if (form.text1.value == "")... . 'form' is the variable which receives the 'this.form' value in the function call. We can get the value of the input element through using 'value' in combination with form.text1. In order to look if the string is empty we compare it with "". If the input string equals "" then no input was done. The user will get an error message. If something is entered the user will get an ok. The problem here is that the user might enter only spaces. This is seen as a valid input! If you want to, you can of course check for these possibilities and exclude them. I think this is quite easy with the information given here. Now have a look at the test2(form) function. This function again compares the input string with the empty string "" to make sure that something has been entered. But we have added something to the if-command. The || is called the OR-operator. You have learned about it in part 6 of this introduction. The if-command checks if either the first or the second comparison is true. If at least one of them is true the whole if-command gets true and the following command will be executed. This means that you will get an error message either if your string is empty or if there isn't a @ in your string. The second operation in the if-command looks if the entered string contains a @.
Checking for certain characters
Sometimes you want to restrict the form input to certain characters or numbers. Just think of a telephone number - the input should only contain digits (we assume that the telephone number does not contain any characters). We could check if the input is a number. But most people use different symbols in their telephone number - for example: 01234-56789, 01234/56789 or 01234 56789 (with a space inbetween). The user should not be forced to enter the telephone number without these symbols. So we have to extend our script to check for digits and some symbols.
Here is the source code:
<html>
<head>
<script language="JavaScript">
<!-- hide


// You can use this code if you leave this message
// ******************************************************

function check(input) {
var ok = true;

for (var i = 0; i < input.length; i++) {
var chr = input.charAt(i);
var found = false;
for (var j = 1; j < check.length; j++) {
if (chr == check[j]) found = true;
}
if (!found) ok = false;
}

return ok;
}

function test(input) {

if (!check(input, "1", "2", "3", "4",
"5", "6", "7", "8", "9", "0", "/", "-", " ")) {

alert("Input not ok.");
}
else {
alert("Input ok!");
}
}

// -->
</script>
</head>

<body>
<form>
Telephone:
<input type="text" name="telephone" value="">
<input type="button" value="Check"
onClick="test(this.form.telephone.value)">
</form>
</body>
</html>
The function test() specifies which characters are valid.
Submitting form input
What different possibilities do exist for submitting form input? The easiest way is to submit the form input via e-mail. This is the method we are going to look at a little bit closer. If you want the form input to be handled by the server you need to use CGI (Common Gateway Interface). This allows you to process the form input automatically. The server might for example build up a database from the input received by some customers. Another example are index-pages like Yahoo. They usually have a form for making a search in their database. The user gets a response quickly after the submit button was hit. He does not have to wait until the people maintaining this server read the input and then look up the information requested. This is done automatically by the server. JavaScript cannot do things like this. You cannot create guestbooks with JavaScript because JavaScript isn't able to write to a file on the server. You can only do this through CGI. Of course you can create a guestbook with the people answering via e-mail. You have to enter the feedback manually though. This is ok if you don't expect to get 1000 feedback mails a day. This script here is plain HTML. So no JavaScript is needed here! Only, of course, if you want to check the input before the form is submitted you will need JavaScript. I have to add that the mailto-command does not work everywhere - for example the Microsoft Internet Explorer 3.0 does not support it.
<form method=post action="mailto:your.address@goes.here" enctype="text/plain">
Do you like this page?
<input name="choice" type="radio" value="1">Not at all.<br>
<input name="choice" type="radio" value="2" CHECKED>Waste of time.<br>
<input name="choice" type="radio" value="3">Worst site of the Net.<br>
<input name="submit" type="submit" value="Send">
</form>
The property enctype="text/plain" is used in order to send plain text without encoded parts. This makes it much easier to read the mail.
If you want to validate the form before it is sent over the net you can use the onSubmit event-handler. You have to put this event-handler into the <form> tag. This looks like this:
function validate() {
// check if input ok
// ...

if (inputOK) return true
else return false;
}

...

<form ... onSubmit="return validate()">

...
With this code the form isn't being sent over the Internet if the form input was wrong.
Setting the focus to a certain form-element
With the help of the focus() method you can make your form a little bit more user-friendly. You can define which element is in focus at the beginning. Or you could tell the browser to focus on the form where the input was wrong. This means that the browser will set the cursor into the specified form-element so the user does not have to click on the form before entering anything. You can do this with the following piece of script:
function setfocus() {
document.first.text1.focus();
}
This script would set the focus to the first text-element in the script I have shown above. You have to specify the name of the whole form - which is called first here - and the name of the single form element - here text1. If you want to put the focus on this element when the page is being loaded you can add an onLoad-property to your <body> tag. This looks like this:
<body onLoad="setfocus()">
We can extend this with the following code:
function setfocus() {
document.first.text1.focus();
document.first.text1.select();
}
Just try this code:
You can see that the text-element gets the focus and the input is being selected.
Writing functions
General syntax
Functions group together script code; control structures, operations, method calls, etc. in the same way as a normal script. These functions can then be called when needed, and the code contained within them will be run. This makes it very easy to reuse code without having to repeat it within your script.
Functions are defined using one of these constructs:
Normal function constructfunction nameOfFunction(listOfVariableNames)
{ function code should be written here }nameOfFunction = function (listOfVariableNames)
{ function code should be written here };nameOfFunction = function anotherNameForTheFunction(listOfVariableNames)
{ function code should be written here };Note that in this particular case, because the function is being assigned, and not defined normally, the name anotherNameForTheFunction can be used by the code inside the function to refer to the function itself, but the code outside the function cannot see it at all (note that some browsers, mainly Internet Explorer, do not implement this correctly, so you should not rely on it - it is better to use arguments.callee as shown below).
The Function class constructor
functionName = new Function("function
code should be written here");functionName = new Function("varName","varName2","etc.","function
code");See the section on 'Referencing' subsection 'Avoiding referencing conflicts' to see how to choose names for your functions.
Functions are called using one of these:
nameOfFunction(listOfVariables);window.nameOfFunction(listOfVariables);object.onEventName = nameOfFunction;
Note that you should never create a function using the normal function construct inside an 'if' statement (or any equivalent control structure). This is permitted by the JavaScript 1.5 specification, but this conflicts with ECMAScript 3, the core language used by JavaScript 1.5. As a result, some browsers allow it, and some do not. It is best not to rely on either behaviour, and do not try to declare functions in this way.
Passing variables to functions
Variables passed to a function are known as arguments.
When a function is called, the variables or values passed to it in the brackets are assigned to the variable names in the brackets of the function definition.
function checkval(passvar) { //if I
ran the function using the command "checkval('hello')" //then passvar would take
on the value 'hello' if( passvar != "" ) { document.myform.mytextinput.value
= passvar; } }
This function, when called, will set the value of a text input to whatever value of passvar was, as long as passvar was not blank.
As an example, part of my html will contain this:
<input type="button" onClick="checkval('pygmy')">When the user clicks on the button, the text input's value will change to 'pygmy'.
You can pass more than one variable to a function using commas to separate the values:
function functionName(variable1,variable2,variable3,etc.)
{ function code } functionName(5,6,7,etc.);
You can pass no variables to a function like this
function functionName() { function code } functionName();If I called that last function using something like this:
functionName(1,2,3,myVar,window,'stringy bit')The variables would still be passed to the function but I would only be able to access the variables using the arguments collection (which can also be referenced as referenceToFunction.arguments).
You can use the arguments collection to refer to the arguments, even if you did not write the variable name in the function definition, or you can mix it so that some variable names are defined but others are only available using the arguments collection:
function functionName(variable1,variable2) { window.alert(variable1);
//alerts 5 window.alert(arguments[0]);
//alerts 5 window.alert(variable2); //alerts 6
window.alert(arguments[1]); //alerts 6 window.alert(arguments[2]);
//alerts 7 window.alert(functionName.arguments[3]);
//alerts 8 } functionName(5,6,7,8);
The arguments collection also has a very useful property; arguments.callee. This is a reference to the function itself, meaning that code running inside an anonymous function can still obtain a reference to the function that is being run. This property is not available in some older browsers.
Using the return statement
The return statement causes a function to stop executing at that point. The code that called the function will still continue to execute.
function doWhatever() { var apod = Math.pow(3,7); return;
//the following code will not be executed, //no matter what
apod *= 34; if( 700 * 3 <= apod ) { return; //return on its
own is more usually //used as part of a conditional } else { window.alert('The
script has made a mistake'); } }
The following is an example of using the return statement to return a variable from a function:
function appendComment(passvar) { //in
this case, I have passed a string variable and I return //a string variable. I could
return any variable type I want. passvar += ' without your help'; return
passvar; } var myString = appendComment('I did it'); //myString
is now 'I did it without your help'
Note that if you need your code to work in older browsers, it is important to make sure that if the return statement is used to return a value, you must ensure that in all cases, the function returns a value, or some Netscape 4 versions will produce errors.
Take, for example, the action of fading. I want to write the same thing repeatedly, slowly fading from one colour to another. Rather than having to calculate this manually, I want to run some script that calculates the fade for me. The script will run nicely as part of a function, where the function returns the next colour at each step, which I can then use. This is useful, because I can then use the same function to produce a variation of the same effect later on, based on different parameters.
function fadeColour( fromcol, tocol, fadePortion
) { //in the format fadeColour( 'ff0098', 'fe0934', 0.23 )
var oF = [], oT = [], oP = [];
var oH = ['0','1','2','3','4','5','6','7','8','9','a','b','c','d','e','f'];
//get the red, green and blue substrings ... for( var x = 0; x < 3; x++ ) { //...
and convert them from hex into decimal ... oF[x] = eval( '0x' + fromcol.substring(
2 * x, ( 2 * x ) + 2 ) ); oT[x] = eval( '0x' + tocol.substring( 2 * x, ( 2 * x )
+ 2 ) ); //... add on the required portion of difference between
the two ... oP[x] = Math.round( oF[x] + ( ( oT[x] - oF[x] ) * fadePortion
) ); //... and convert it back into hex ... oP[x] =
oH[ ( oP[x] - ( oP[x] % 16 ) ) / 16 ] + oH[ oP[x] % 16 ]; } //...
and put them back together again as a colour string return '#' + oP.join('');
} for( var y = 0; y < 10; y++ ) { //in 10 steps, fade the colour
- also see the section on writing with script document.write( '<span
style="color:' + fadeColour( 'd2cbff', '000099', y / 9 ) + ';">Fade!<\/span>
' ); } for( var y = 0; y < 12; y++ ) { //in 12 steps, fade
the colour document.write( '<span style="color:' + fadeColour( 'ff0000',
'000000', y / 11 ) + ';">Fade!<\/span> ' ); }
Fade! Fade! Fade! Fade! Fade! Fade! Fade! Fade! Fade! Fade!
Fade! Fade! Fade! Fade! Fade! Fade! Fade! Fade! Fade! Fade! Fade! Fade!
Warning, if you are returning a value from a function, do not call the function directly from the <a href= method to activate it, or many browsers will (correctly) create a new page containing the returned value as the page content. You can still use return; on its own. You can only return values if you call the function script from another piece of script (like another function).
If you need to call the function using the <a href= method, use the void operator.
Note, returning false for many events will cancel the action. As an example, if a user submits a form, returning false will cause the form not to be submitted. The exception is onmouseover, where returning true will stop the mouseover from having any effect (such as with a link, where returning true will stop the link url from being displayed in the status bar).
Variable scope
Variable scope is one of the very useful features of languages like JavaScript, so even though it may seem a little complicated, it is worth taking the time to learn how it works.
In a basic script, there may be any number of variables and functions. Take the following example:
var a = 1, b = 2, c = 3; function sample() { var d; a = 7;
} sample(); alert(a);
The variables a, b and c are not inside any function when they are declared, so they are in a scope called the global scope. They are available anywhere. Code anywhere else in the script, including inside the sample function, has access to them. The sample function is also global, since it is not inside any other functions. If any other piece of code changes the contents of those variables, then every other part of the code now sees the new contents. As a result, the alert here will show '7', since the value held by the global variable is changed when the function is run.
Variable d is defined inside the sample function, so it is not global. It is in the local scope of the function. What that means is that only the code inside the function can see it. Code outside the function does not even know it exists. This happens with any function. They have the ability to create their own scopes, and their own local variables, without them interfering with variables located in the global scope.
Now try this modification to the code:
var a = 1, b = 2, c = 3; function sample() { var a, d; a =
7; } sample(); alert(a);
Here, the variable a is redefined inside the function. Because it is declared using the var keyword, it becomes a local instance of a variable. Even though it shares the same name as a global variable, the two are completely independent. The changes made to that variable inside the function only affect the local variable, not the global one. As a result, the alert will show '1', and not '7'.
Now imagine that the code inside the function wants to reference the global variable
'a' instead of the local one. The global scope is special. In JavaScript, the global scope can be referenced using the name
'window'. The code inside the function can use window.a to reference the global
'a' variable. Incedentally, this is why methods like alert can be called using either
alert or
window.alert, since these methods are globally available (unless they are overwritten in the current scope, of course).
Nested functions
It is possible to create functions inside other functions. Simply declare another function inside the code of an existing function:
var a = 1, b = 2, c = 3; function sample() { var a, d, e;
function anothersample() { var e, f; } anothersample(); } sample();
In that example, the anothersample function only exists inside the sample function, and it can only be called by the code inside the sample function. Code outside that function does not even know it exists. The scopes are also nested, so the code inside the anothersample function has access to b and c from the global scope, a and d from the sample scope, and then e and f from its own local scope. It can also use window.a to reference the variable a from the global scope.
Of course, if you assign a reference to the nested function to a global variable, then the function can be accessed globally through that variable. There is not much point in doing that here, but it becomes very useful when creating object methods (these will be covered in detail in a later chapter).
Scopes have memory
Scopes are actually very clever, since they persist over time. Imagine that the code inside a function creates a local variable. It also creates an event handler function that will be triggered when the user clicks a link:
function sample() { var a = 20; document.links[0].onclick
= function () { alert(a); }; } sample();
The action that calls the event handler (inner) function happens much later, a long time after the script that created it has finished running. However, the variable 'a' has survived, so the alert will display the number 20.
Using scope to prevent conflicts
Imagine that you are running a script that uses many global variable and function names. You want to put another script on the same page, but there is a chance that the two scripts will use the same variable names as each other, and may conflict. It is easy to workaround this problem by putting the code from each script inside a function, and running the function. That way, the local scope provided by the function will protect the variables overwriting each other in the global scope. Note that when doing this, it is very important that you remember to declare your variables properly.
The easy way to do this without creating a global function is to create an anonymous function, and enclosing it in parenthesis (internally, the engine will then replace that entire construct with the function reference). You can then use the open-close parenthesis to run it immediately. This construct may look a little odd, but it works.
Approaches to Event Binding in Javascript
The three event models align themselves with the Document Object Model (DOM) triumvirate: Netscape Navigator 4 (NN4), Internet Explorer 4 and later for Macintosh and Windows (IE4+), and the W3C DOM, as implemented in Safari. Despite sometimes substantial differences among the models, they can all work side-by-side in the same document with the help of a few JavaScript shortcuts. This article focuses on two key aspects of the conflicting event models:
- Methods for binding an event to an HTML element object.
- Processing the event after it fires.
Approaches to Event Binding
Event binding is the process of instructing an HTML element to respond to a system or user action. There are no fewer than five binding techniques implemented in various browser versions. A quick overview of these techniques follows.
Event Binding I: Element Attributes
The simplest and most backward-compatible event binding avenue is an element tag’s attribute. The attribute name consists of the event type, preceded by the preposition “on.” Although HTML attributes are not case-sensitive, a convention has evolved to capitalize the first letters of each “word” of the event type, such as onClick and onMouseOver. These attributes are also known as event handlers, because they instruct an element how to “handle” a particular type of event.
Proper values for event handler attributes come in the form of JavaScript statements within quoted strings. Most commonly, a statement calls a script function that is defined inside a <SCRIPT> tag earlier in the document — usually in the <HEAD> portion. For a function defined as:
function myFunc() {
// script statements here
}
an event handler in, say, a button form control looks like the following:
<INPUT TYPE="button" NAME="myButton" VALUE="Click Here"
onClick="myFunc()">
Event binding through element attributes has the advantage of allowing you to pass parameters to the event handler’s function. A special parameter value — the this keyword — passes a reference to the element receiving the event. The following code demonstrates how one function can convert the content of any number of text boxes to uppercase characters with the help of the passed parameter:
<SCRIPT LANGUAGE="JavaScript">
function convertToUpper(textbox) {
textbox.value = textbox.value.toUpperCase();
}
</SCRIPT>
...
<FORM ....>
<INPUT TYPE="text" NAME="first_name" onChange="convertToUpper(this)">
<INPUT TYPE="text" NAME="last_name" onChange="convertToUpper(this)">
...
</FORM>
Event Binding II: Object Properties
For NN3+ and IE4+ browsers, scripters can bind events to objects by way of script statements instead of as tag attributes. Each element object that responds to events has properties for each event it recognizes. The property names are lowercase versions of the tag attributes, such as onmouseover. NN4 also accepts the interCap versions of the property names, but for cross-browser compatibility, the all-lowercase versions are trouble-free.
Binding occurs when you assign a function reference to the event property. A function reference is the name of the function, but without the parentheses of the definition. Therefore, to bind the click event of a button named myButton to invoke a function defined as myFunc(), the assignment statement is as follows:
document.forms[0].myButton.onclick = myFunc;
One point you should notice is that there is no way to pass a parameter to the function when the event fires. I’ll come back to this point later in the discussion of event processing.
Event Binding III: IE4+ <SCRIPT FOR> Tags
In IE4+, Microsoft implements its own extensions to the <SCRIPT> tag that bind the enclosed script statements to one event type for one element. The tag’s attributes that make this binding possible (not sanctioned by the W3C for HTML) are FOR and EVENT.
The value of the FOR attribute must be the unique identifier you assign to an element’s ID attribute. You must then assign the name of the event (onmouseover, onclick, etc) to the EVENT attribute. Using the button example above, the button’s tag must be modified to include an ID attribute:
<INPUT TYPE="button" NAME="myButton" ID="button1" VALUE="Click Here">
Script statements are not in a function, but within the <SCRIPT> tag, as follows:
<SCRIPT FOR="button1" EVENT="onclick">
// script statements here
</SCRIPT>
Naturally, statements inside the tag can call any other functions defined elsewhere on the page (or imported from a .js file). But this binding style means that you must create a <SCRIPT FOR> tag for each element and each event.
You must also be careful to deploy this binding approach only on pages that will be viewed by IE4+ browsers. Any other scriptable browser (including IE3) that doesn’t implement this special kind of <SCRIPT> tag treats the tag as a regular <SCRIPT> tag, and attempts to execute the statements inside while the page loads — inevitably leading to script errors.
Event Binding IV: The IE5/Windows attachEvent() Method
Implemented before the W3C DOM working group honed the standard event model, the attachEvent() method is available for every HTML element object in the Windows version of IE5 and later. In other words, to bind an event to an element object, invoke the attachEvent() method on that object.
The syntax for the attachEvent() method is as follows:
elemObject.attachEvent("eventName", functionReference);
Values for the eventName parameter are strings representing the event name, such as onmousedown. The functionReference parameter is the same kind of parenthesis-free reference to a function described earlier in the event property approach. Thus, for the button object I’ve been using as an example, the statement that binds the function to the button’s click event is as follows:
document.getElementById("button1").attachEvent("onclick", myFunc);
Since the attachEvent() method works strictly in the IE5+/Windows environment, you can use either the W3C DOM element reference (above) or the IE4+ reference:
document.all.button1.attachEvent("onclick", myFunc);
One caveat about this approach: You cannot permit the statement to execute before the element’s tag loads in the browser. The reference to the button object is not valid until the HTML creates the element in the browser. Therefore, such binding statements need to run either at the bottom of the page or in a function invoked by the onLoad event handler of the BODY element.
Event Binding V: The W3C DOM addEventListener() Method
Safari uses the W3C DOM Level 2 event binding mechanism, which, while similar to the IE5/Windows attachEvent() approach, has its own syntax. The W3C DOM specification assigns the addEventListener() method to every node in the DOM hierarchy. While an HTML element is a type of DOM node, a text node inside an element’s tag set is also a node capable of receiving events. This is an important point that haunts NN6 event processing, as you will see later in this article.
The syntax for the addEventListener() method is as follows:
nodeReference.addEventListener("eventType", listenerReference, captureFlag);
In the jargon of the W3C DOM specification, the addEventListener() method registers an event with a node, instructing the node what to do with the event. The first parameter of the method is a string declaring the type of event (without the “on”), such as click, mousedown, and keypress. Treat the second parameter of addEventListener() in the same manner as the function reference described earlier. The third parameter is a Boolean value that signifies whether the node should listen for the event in what the DOM calls capture mode. The subject of event capture and bubbling — collectively called event propagation — is subject best left for another article. For a typical event listener, the third parameter should be false.
Which Binding is Best?
If you’re lucky enough to be creating applications for a single browser version and operating system, you can opt for the most modern binding for the chosen browser. Cross-browser authors, however, have a substantial challenge.
If you plan to support IE5/Mac, you can dismiss the attachEvent() and addEventListener() methods because IE5/Mac supports neither of these. Your practical choice, then, is between the tag attribute and object property approaches. This is where psychological conflicts come into play.
On the one hand, the tag attribute approach is acknowledged by the W3C DOM Level 2 recommendation as an acceptable substitute for the addEventListener() method. To be compatible with millions of existing scripts, all scriptable browsers support tag attribute binding. Automated authoring tools, such as DreamWeaver, also embed event handler attributes in HTML tags.
On the other hand, embedding script-oriented information within an element’s tag flies in the face of the compelling trend toward separating content from style and behavior. Binding events as object properties heads in the right direction, but there is no “official” support for event properties in W3C standards related to HTML, XHTML, or DOM. The approach is, however, supported in real life by all but the first-generation scriptable browsers.
A standards purist will find fault with either approach; but a practical developer should feel “safe” with either approach, even when considering compatibility with future mainstream browsers.
The Event Mother Lode: The Event Object
At the core of all three event models is an event object — an abstract entity whose properties contain a ton of information that is potentially valuable to functions that process events. From the discussion of event binding techniques earlier in this article, you might deduce one reason why the event object is so vital to scripts: with the exception of tag attribute binding, no binding approach permits parameter passing to the event handler function.
The event object fills the gap by providing enough “hooks” to let a function read event characteristics. Thus, a function can retrieve a reference to the element that received the event and other tidbits, such as coordinates of mouse actions, mouse button(s) used, keyboard keys pressed, and whether any modifier keys were held down during the event (for example, to detect a Shift-click).
Accessing the Event Object
Although the precise composition of the event object varies according to the three DOMs discussed throughout this article (NN4, IE4+, and W3C/Safari), an event handler function can access an event object in only one of two ways: the NN way and the IE way. The W3C/Safari DOM event object exposes itself to scripts the same way the NN4 event object does; IE4+, on the other hand, has a different approach.
The IE4+ event object is easier to describe, so we’ll cover that first. Simply said, the event object is a property of the window object. By implication, this means that only one event object exists at any instant. For example, the simple act of pressing and releasing a keyboard key generates three events: onKeyDown, onKeyPress, and onKeyUp (in that order). If a function invoked by the onKeyDown event takes a long time to process, the browser holds the other two events in a queue until all of the onMouseDown event’s function processing completes.
On the NN4 and W3C DOM sides, the event object seems even more abstract. For all event binding techniques except the tag attribute style, the event object gets passed automatically to the function bound to the event. A single parameter is sent to the function. It is your job to provide a parameter variable in the function definition to “receive” that parameter value. To avoid conflict with the IE window.event object, do not use event as the parameter name. The variable name evt is as good as any. Such a function definition looks like the following:
function myFunc(evt) {
// script statements here
}
If you use the tag attribute event binding technique, however, you must explicitly pass the event as one of the parameters of your function call. To do this, use the event keyword as the parameter:
onClick = "myFunc(event)"
The incoming parameter variable is your function’s only connection to the NN event object. If the object or its values are needed in another function that is invoked from within the main event handler function, you must relay the object or its property value(s) as a parameter(s) to the other functions.
If you’re wondering whether IE would plug the window.event property into this event reference, the answer is, “Yes.” This syntax overlap is a safe because both the NN and IE event objects that get passed to the function have the desired property values of the current event.
Accommodating Both Event Object References
Assuming that a function needs to inspect one or more properties of an event object to process the event, a simple technique lets your function work with the event object passed as a parameter or read from the window.event property. Moreover, the technique doesn’t require an ounce of browser version sniffing.
To begin, always define your event handler functions with a parameter variable to prepare for the possibility of an incoming event object. Then use a simple conditional expression to assign the event object of the browser to that parameter variable:
function myFunc(evt) {
evt = (evt) ? evt : ((window.event) ? window.event : "")
// process event here
}
If the event object arrives as a parameter, it remains assigned to the evt local variable inside the function. But if the parameter is null and the browser’s window object includes an event property, then the window.event object assigns itself to the evt variable.
To complete the job, however, you should also include one more conditional layer that gracefully handles earlier browsers lacking an event object in their object models:
function myFunc(evt) {
evt = (evt) ? evt : ((window.event) ? window.event : "")
if (evt) {
// process event here
}
}
By building all event handler functions this way, you define a function that accommodates event objects passed explicitly from tag attribute binding or implicitly from event property binding. Even if you change the binding style during development, the function doesn’t have to change.
JavaScript: Form Validation
Any interactive web site has form input - a place where the users input different kind of information. This data is passed to ASP script, or some other technology and if the data contains an error, there will be a delay before the information travels over the Internet to the server, is examined on the server, and then returns to the user along with an error message.
If you run a validation of the user’s form input before the form is submitted, there will be no wait time and redundant load on the server. "Bad data" are already filtered out when input is passed to the server-based program. It also allows to simplify server-based program.
Client side form validation usually done with javascript. For the majority of your users, JavaScript form validation will save a lot of time up front, but double-checking the data on the server remains necessary, in case the user has turned JavaScript off.
Form data that typically are checked by a JavaScript could be:
validateFormOnSubmit ( )
This is a main function that calls a series of sub functions, each of which checks a single form element for compliance. If the element complies than sub functionreturns an empty string. Otherwise it returns a message describing the error and highlight appropriate element with yellow.
function validateFormOnSubmit(theForm) { var reason = ""; reason += validateUsername(theForm.username); reason += validatePassword(theForm.pwd); reason += validateEmail(theForm.email); reason += validatePhone(theForm.phone); reason += validateEmpty(theForm.from); if (reason != "") { alert("Some fields need correction:\n" + reason); return false; } return true; }
validateEmpty ( )
The function below checks if a required field has been left empty. If the required field is blank, we return the error string to the main function If it’s not blank, the function returns an empty string.
function validateEmpty(fld) {
    var error = "";
    if (fld.value.length == 0) {
        fld.style.background = 'Yellow';
        error = "The required field has not been filled in.\n"
    } else {
        fld.style.background = 'White';
    }
    return error;

}
validateUsername ( )
The function below checks if the user entered anything at all in the username field. If it’s not blank, we check the length of the string and permit only usernames that are between 5 and 15 characters. Next, we use the JavaScript regular expression /\W/ to forbid illegal characters from appearing in usernames. We want to allow only letters, numbers and underscopes.
function validateUsername(fld) {
    var error = "";
      var illegalChars = /\W/; // allow letters, numbers, and underscores
    if (fld.value == "") {
        fld.style.background = 'Yellow';
        error = "You didn't enter a username.\n";
    } else if ((fld.value.length < 5) || (fld.value.length > 15)) {
        fld.style.background = 'Yellow';
        error = "The username is the wrong length.\n";
    } else if (illegalChars.test(fld.value)) {
        fld.style.background = 'Yellow';
        error = "The username contains illegal characters.\n";
    } else {
        fld.style.background = 'White';
    }

    return error;
}
validatePassword ( )
The function below checks the password field for blankness and allow only letters and numbers - no underscopes this time. So we should use a new regular expression to forbid underscopes. This one /[\W_]/ allow only letters and numbers. Next, we want to permit only passwords that contain letters and at least one numeral. For that we use the seacrh() method and two more regular expressions: /(a-z)+/ and /(0-9)/.
function validatePassword(fld) {
    var error = "";
   var illegalChars = /[\W_]/; // allow only letters and numbers
    if (fld.value == "") {
        fld.style.background = 'Yellow';
        error = "You didn't enter a password.\n";
    } else if ((fld.value.length < 7) || (fld.value.length > 15)) {
        error = "The password is the wrong length. \n";
        fld.style.background = 'Yellow';
      } else if (illegalChars.test(fld.value)) {
        error = "The password contains illegal characters.\n";
        fld.style.background ='Yellow';
      } else if (!((fld.value.search(/(a-z)+/)) && (fld.value.search(/(0-9)+/)))) {
        error = "The password must contain at least one numeral.\n";
        fld.style.background = 'Yellow';
      } else {
        fld.style.background = 'White';
    }
   return error;
}
validateEmail ( )
Next we want to see ifthe email address the user entered is real. This means that the input data must contain at least an @ sign and a dot (.). Also, the @ must not be the first character of the email address, and the last dot must at least be one character after the @ sign.
At first we check if the user entered anything at all in the email field. Next, we use regular expression and the test() method to check the field for a compliance. Also we will use trim() function that will trim leading whitespace off the string. This won’t be perfect validation — it is possible to slip not compliant addresses by it — but it's normally good enough.
function trim(s)
{
  return s.replace(/^\s+|\s+$/, '');
}

function validateEmail(fld) {
    var error="";
      var  tfld = trim(fld.value);                        // value of field with whitespace trimmed off
      var  emailFilter = /^[^@]+@[^@.]+\.[^@]*\w\w$/ ;
     var  illegalChars= /[\(\)\<\>\,\;\:\\\"\[\]]/ ;


    if (fld.value == "") {
        fld..style.background = 'Yellow';
        error = "You didn't enter an email address.\n";
    } else if (!emailFilter.test(tfld)) {              //test email for illegal characters
        fld..style.background  ='Yellow';
        error = "Please enter a valid email address.\n";
    } else if (fld.value.match(illegalChars)) {
        fld..style.background  ='Yellow';
        error = "The email address contains illegal characters.\n";
    } else {
        fld..style.background  = 'Yellow';
      }
    return error;
}
validatePhone ( )
The function below checks if the phone number is valid. At first we use regular expression and the replace() method to clear out any spacer characters. Next, we use the isNaN() function to check if the phone number contain only numbers. At last we check the length of the string and permit only phone numbers with 10 digits.
function validatePhone(fld) {
    var error = "";
    var stripped = fld.value.replace(/[\(\)\.\-\ ]/g, '');


   if (fld.value == "") {
        error = "You didn't enter a phone number.\n";
        fld.style.background = 'Yellow';
      } else if (isNaN(parseInt(stripped))) {
        error = "The phone number contains illegal characters.\n";
        fld.style.background = ''Yellow';
      } else if (!(stripped.length == 10)) {
        error = "The phone number is the wrong length. Make sure you included an area code.\n";
        fld.style.background ='Yellow';
      }

    return error;
}
HTML Form
This script accompanies an HTML form. When the user clicks the Submit button on the form, the form data is sent to a JavaScript validation function that checks each field to make sure that it is in the appropriate format. The HTML form could look something like this:
<html> <head> <title> JavaScript validation</title> </head> <body> <h1>JavaScript validation</h1> <form name="demo" onsubmit="return validateFormOnSubmit(this)" action="test.htm"> <table summary="Demonstration form"> <tbody> <tr> <td><label for="username">Your user name:</label></td> <td><input name="username" size="35" maxlength="50" type="text"></td> </tr> <tr> <td><label for="pwd">Your password</label></td> <td><input name="pwd" size="35" maxlength="25" type="password"></td> </tr> <tr> <td><label for="email">Your email:</label></td> <td><input name="email" size="35" maxlength="30"type="text"></td> </tr> <tr> <td><label for="phone">Your telephone number:</label></td> <td><input name="phone" size="35" maxlength="25" type="text"></td> </tr> <tr> <td> <label for="from">Where are you </label></td> <td><input name="from" size="35" maxlength="50" type="text"></td> </tr> <tr> <td> </td> <td><input name="Submit" value="Send" type="submit" ></td> <td> </td> </tr> </tbody> </table> </form> </body> </html>
SelectBox or Html Dropwown List
 <select id="x11" onchange="change(1);" size="11" name="x11">
<option value="#F0F8FF">aliceblue</option>
<option value="#FAEBD7">antiquewhite</option>
<option value="#00FFFF">aqua</option>
<option value="#7FFFD4">aquamarine</option>
<option value="#F0FFFF">azure</option>
<option value="#F5F5DC">beige</option>
<option value="#FFE4C4">bisque</option>
</select>
 <script type="text/javascript">
function change(p1) {
var validChar='0123456789ABCDEF';
x11Obj=document.getElementById('x11');safeObj=document.getElementById('safe');
rawObj=document.getElementById('raw');hexObj=document.getElementById('hex');
rgbObj=document.getElementById('rgb');pcObj=document.getElementById('pc');
if  (p1==1){entry=x11Obj.
options[x11Obj.selectedIndex].value;
safeObj.selectedIndex=-1;rawObj.value="";}
if  (p1==2){entry=safeObj.
options[safeObj.selectedIndex].text;
x11Obj.selectedIndex=-1;rawObj.value="";}
if  (p1==3){entry=rawObj.
value;x11Obj.selectedIndex=-1;safeObj.selectedIndex=-1;}
if  (entry.charAt(0)!=="#") {entry="#" + entry;} // ensure leading # entry=entry.
toUpperCase();strlen=entry.length;
if (strlen!=7) {
alert("Entry must be
EXACTLY 6 or 7 characters long");return false;
}
for (var i=1;i<7;i++) {
if  (validChar.indexOf(entry.charAt(i))<0) {
alert("Entry must be
in #RRGGBB hexcode format!");return false;}
}
document.body.style.backgroundColor=entry;hexObj.value=entry;
r=parseInt(entry.substr(1,2),16);rp=Math.round((r*1000)/2560)+'%,';
g=parseInt(entry.substr(3,2),16);gp=Math.round((g*1000)/2560)+'%,';
b=parseInt(entry.substr(5,2),16);bp=Math.round((b*1000)/2560)+'%';
rgbObj.value=r+','+g+','+b;pcObj.value=rp+gp+bp;}
 </script>
Javascript Best Practices
Introduction
This document is a list of best practices and preferred ways of developing javascript code, based on opinions and experience from many developers in the javascript community. Since this is a list of recommendations rather than a list of absolute rules, experienced developers may have slightly differing opinions from those expressed below.
Always Use 'var'
Variables in javascript either have global scope or function scope, and using the 'var' keyword is vital to keeping them straight. When declaring a variable for use either as a global variable or as a function-level variable, always prefix the declaration with the 'var' keyword. The example below highlights the potential problem caused by not doing so.
Problem Caused By Not Using Var
var i=0; // This is good - creates a global variable
function test() {
for (i=0; i<10; i++) {
alert("Hello World!");
}
}
test();
alert(i); // The global variable i is now 10!
Since the variable i inside the function was not declared as a function-level variable by using the 'var' keyword, it references the global variable in this example. It is a good idea to always declare global variables using 'var', but it is vital to declare function-scoped variables using 'var'. The two approaches below are functionally identical.
Fixed Function
function test() {
var i=0;
for (i=0; i<10; i++) {
alert("Hello World!");
}
}
Fixed Function
function test() {
for (var i=0; i<10; i++) {
alert("Hello World!");
}
}
Feature-Detect Rather Than Browser-Detect
Some code is written to detect browser versions and to take different action based on the user agent being used. This, in general, is a very bad practice. Any code which even looks at the global "navigator" object is suspect.
The better approach is to use feature detection. That is, before using any advanced feature that an older browser may not support, check to see if the function or property exists first, then use it. This is better than detecting the browser version specifically, and assuming that you know its capabilities. Example
if (document.getElementById) {
var element = document.getElementById('MyId');
}
else {
alert('Your browser lacks the capabilities required to run this script!');
}
Use Square Bracket Notation
When accessing object properties that are determined at run-time or which contain characters not compatible with dot notation, use square bracket notation. If you are not an experienced javascript programmer, it's not a bad practice to use square bracket notation all the time.
Objects properties in javascript can be accessed primarily in two ways: Dot notation and Square bracket notation.
Dot notation
MyObject.property
Square bracket notation
MyObject["property"]
With dot notation, the property name is hard-coded and cannot be changed at run-time. With bracket notation, the property name is a string which is evaluated to resolve the property name. The string can be hard-coded, or a variable, or even a function call which returns a string property name.
If a property name is being generated at run-time, the bracket notation is required. For example, if you have properties "value1", "value2", and "value3", and want to access the property using a variable i=2:
This Will Work
MyObject["value"+i]
This Will Not
MyObject.value+i
Also, in some server-side environments (PHP, Struts, etc) form field names are appended with [] to denote that the form field should be treated as an array on the server-side. However, referencing a field name containing [] using dot notation will not work because [] is the syntax for reference a javascript array. So, square bracket notation is required.
This Will Work
formref.elements["name[]"]
This Will Not
formref.elements.name[]
The recommendation for using square bracket notation is to always use it when it is required (obviously). Using it when not strictly required is a matter of personal preference and convention. One good rule of thumb is to use dot notation to access standard properties of objects, and square bracket notation to access properties which are defined as objects in the page. So, while document["getElementById"]() is perfectly vaid using square bracket notation, document.getElementById() is the preferred syntax because getElementById is a standard property of the document object as defined in the DOM specifications. Mixing the use of dot and square bracket notation makes it clear which properties are standard and which are names defined by the content:
document.forms["myformname"].elements["myinput"].value
Here, the forms property is a standard property of document, while the form name myformname is defined by the page content. Likewise, the elements property and value property are both defined by the specs, but then myinput name is defined in the page. This syntax is very clear and easy to understand and is a recommended convention to follow, but not a strict rule.
Avoid 'eval'
The eval() function in javascript is a way to run arbitrary code at run-time. In almost all cases, eval should never be used. If it exists in your page, there is almost always a more correct way to accomplish what you are doing. For example, eval is often used by programmers who do not know about using Square Bracket Notation.
The rule is, "Eval is evil." Don't use it unless you are an experienced developer and know that your case is an exception.
Reference Forms and Form Elements Correctly
All forms in an HTML form should have a name attribute. For XHTML documents, the name attribute is not required and instead the form tag should have an id attribute and should be referenced using document.getElementById(). Referencing forms using indexes, such as document.forms[0] is a bad practice in almost all cases. Some browsers make the form available as a property of the document itself using its name. This is not reliable and shouldn't be used.
The example below uses square bracket notation and correct object references to show the most fool-proof way of referencing a form input.
Correct Reference To Form Input
document.forms["formname"].elements["inputname"]
Bad Practice
document.formname.inputname
If you will be referencing multiple form elements within a function, it's best to make a reference to the form object first and store it in a variable. This avoids multiple lookups to resolve the form object reference.
var formElements = document.forms["mainForm"].elements;
formElements["input1"].value="a";
formElements["input2"].value="b";
When validating an input field using onChange or similar event handlers, it is always a good idea to pass a reference to the input element itself into the function. Every input element within a form has a reference to the form object that it is contained in.
<input type="text" name="address" onChange="validate(this)">

function validate(input_obj) {
// Get a reference to the form which contains this element
var theform = input_obj.form;
// Now you can check other inputs in the same form without
// hard-coding a reference to the form itself
if (theform.elements["city"].value=="") {
alert("Error");
}
}
By passing a reference to the form element and accessing its form property, you can write a function which does not contain a hard reference to any specific form name on the page. This is a good practice because the function becomes more reusable.
Avoid 'with'
The 'with' statement in javascript inserts an object at the front scope chain, so any property/variable references will first try to be resolved against the object. This is often used as a shortcut to avoid multiple long references.
Example Using with
with (document.forms["mainForm"].elements) {
input1.value = "junk";
input2.value = "junk";
}
The problem is that the programmer has no way to verify that input1 or input2 are actually being resolved as properties of the form elements array. It is checked first for properties with these names, but if they aren't found then it continues to search up the scope chain. Eventually, it reaches the global object where it tries to treat "input1" and "input2" as global variables and tries to set their "value" properties, which result in an error.
Instead, create a reference to the reused object and use it to resolve references.
Using A Reference Instead
var elements = document.forms["mainForm"].elements;
elements.input1.value = "junk";
elements.input2.value = "junk";
Use onclick In Anchors Instead Of javascript: Pseudo-Protocol
When you want to trigger javascript code from an anchor <A> tag, the onclick handler should be used rather than the javascript: pseudo-protocol. The javascript code that runs within the onclick handler must return true or false (or an expression than evalues to true or false) back to the tag itself - if it returns true, then the HREF of the anchor will be followed like a normal link. If it returns false, then the HREF will be ignored. This is why "return false;" is often included at the end of the code within an onclick handler.
Correct Syntax
<a href="javascript_required.html" onclick="doSomething(); return false;">go</a>
In this case, the "doSomething()" function (defined by the user somewhere in the page) will be called when the link is clicked, and then false will be returned. The href will never be followed for javascript-enabled browsers. However, if the browser does not have javascript enabled, the javascript_required.html file will be loaded, where you can inform your user that javascript is required. Often, links will just contain href="#" for the sake of simplicity, when you know for sure that your users will have javascript enabled. This practice is discouraged. It's always a good idea to put a local fall-back page that will be loaded for users with javascript disabled.
Sometimes, you want to conditionally follow a link. For example, if a user is navigating away from your form page and you first want to validate that nothing has changed. In this case, your onclick will call a function and it will return a value itself to say whether the link should be followed.
Conditional Link Following
<a href="/" onClick="return validate();">Home</a>

function validate() {
return prompt("Are you sure you want to exit this page?");
}
In this case, the validate() function should always return either true or false. True if the user should be allowed to navigate back to the home page, or false if the link should not be followed. This example prompts the user for confirmation, then returns true or false, depending on if the user clicked OK or Cancel.
Below are examples of things NOT to do. If you see code like this in your pages, it is not correct and should be fixed.
What Not To Do
<a href="javascript:doSomething()">link</a>
<a href="#" onClick="doSomething()">link</a>
<a href="#" onClick="javascript:doSomething();">link</a>
<a href="#" onClick="javascript:doSomething(); return false;">link</a>
Use The Unary + Operator To TypeConvert To Number
In javascript, the + operator is used for both addition and concatenation. This can cause problems when adding up form field values, for example, since javascript is a non-typed language. Form field values will be treated as strings, and if you + them together, javascript will treat it as concatenation instead of addition.
Problematic Example
<form name="myform" action="[url]">
<input type="text" name="val1" value="1">
<input type="text" name="val2" value="2">
</form>

function total() {
var theform = document.forms["myform"];
var total = theform.elements["val1"].value + theform.elements["val2"].value;
alert(total); // This will alert "12", but what you wanted was 3!
}
To fix this problem, Javascript needs a hint to tell it to treat the values as numbers, rather than strings. You can use the unary + operator to convert the string value into a number. Prefixing a variable or expression with + will force it to evaluate as a number, which can then be successfully used in a math operation.
Fixed Example
function total() {
var theform = document.forms["myform"];
var total = (+theform.elements["val1"].value) + (+theform.elements["val2"].value);
alert(total); // This will alert 3
}
Avoid document.all
document.all was introduced by Microsoft in IE and is not a standard javascript DOM feature. Although many newer browsers do support it to try to support poorly-written scripts that depend on it, many browsers do not.
There is never a reason to use document.all in javascript except as a fall-back case when other methods are not supported and very early IE support (<5.0) is required. You should never use document.all support as a way to determine if the browser is IE, since other browsers also now support it.
Only Use document.all As A Last Resort
if (document.getElementById) {
var obj = document.getElementById("myId");
}
else if (document.all) {
var obj = document.all("myId");
}
Some rules for using document.all are
- Always try other standard methods first
- Only fall back to using document.all as a last resort
- Only use it if you need to support IE versions earlier than 5.0
- Always check that it is supported with "if (document.all) { }" around the block where you use it.
Don't Use HTML Comments In Script Blocks
In the ancient days of javascript (1995), some browsers like Netscape 1.0 didn't have any support or knowledge of the script tag. So when javascript was first released, a technique was needed to hide the code from older browsers so they wouldn't show it as text in the page. The 'hack' was to use HTML comments within the script block to hide the code.
Using HTML Comments In Script Is Bad
<script language="javascript">
<!--
// code here
//-->
</script>
No browsers in common use today are ignorant of the <script> tag, so hiding of javascript source is no longer necessary. In fact, it can be considered harmful for the following reasons:
- Within XHTML documents, the source will actually be hidden from all browsers and rendered useless
- -- is not allowed within HTML comments, so any decrement operations in script are invalid
Avoid Cluttering The Global Namespace
Global variables and functions are rarely required. Using globals may cause naming conflicts between javascript source files and cause code to break. For this reason, it is a good practice to encapsulate functionality within a single global namespace.
There are several ways to accomplish this task, some of which are much more complicated than others. The simplest approach is to create a single global object and assign properties and methods to this object.
Creating A Namespace
var MyLib = {}; // global Object cointainer
MyLib.value = 1;
MyLib.increment = function() { MyLib.value++; }
MyLib.show = function() { alert(MyLib.value); }

MyLib.value=6;
MyLib.increment();
MyLib.show(); // alerts 7
Namespaces can also be created using Closures, and Private Member Variables can also be simulated in javascript.
Avoid sync "Ajax" calls
When making "Ajax" requests, you may choose either async or sync mode. Async mode runs the request in the background while other browser activities can continue to process. Sync mode will wait for the request to return before continuing. Requests made with sync mode should be avoided. These requests will cause the browser to lock up for the user until the request returns. In cases where the server is busy and the response takes a while, the user's browser (and maybe OS) will not allow anything else to be done. In cases where a response is never properly received, the browser may continue to block until the request is timed out. If you think that your situation requires sync mode, it is most likely time to re-think your design. Very few (if any) situations actually require Ajax requests in sync mode.
Use JSON
When storing data structures as plain text or sending/retrieving data structures via Ajax, use JSON instead of XML when possible. JSON (JavaScript Object Notation) is a more compact and efficient data format, and is language-neutral.
Use Correct <script> Tags
The LANGUAGE attribute is deprecated in the <script> tag. The proper way to create a javascript code block is:
<script type="text/javascript">
// code here
</script>