

ASP.NET MVC Introduction
MVC is one of three ASP.NET programming models. MVC is a framework for building web applications using a MVC (Model View Controller) design:
- The Model represents the application core (for instance a list of database records).
- The View displays the data (the database records).
- The Controller handles the input (to the database records).
IMPORTANT POINT: MVC CAN ONLY ACT AS 3-LAYER ARCHITECTURE IN CASE OF SMALL APPLICATION DEVELOPMENT ,BUT IN CASE OF ENTERPRISE/BIG APPLICATIONS MVC( MODEL, VIEW AND CONTROLLER ) ARE JUST 3 LAYERS OF PRESENTATION LAYER.
The MVC model also provides full control over HTML, CSS, and JavaScript
The Modelis the part of the application that handles the logic for the application data. Often model objects retrieve data (and store data) from a database.
The Viewis the parts of the application that handles the display of the data. Most often the views are created from the model data.
The Controlleris the part of the application that handles user interaction. Typically controllers read data from a view, control user input, and send input data to the model.
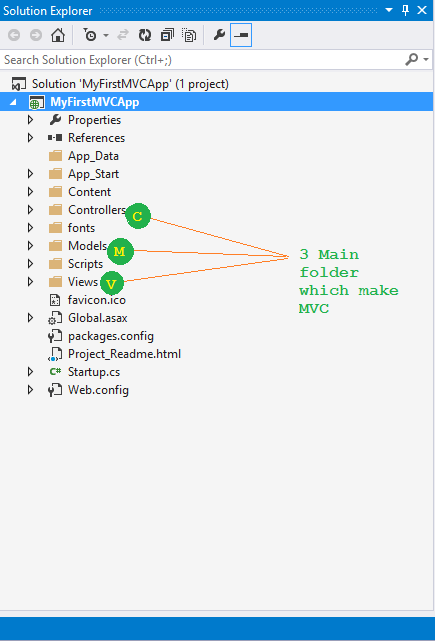
When you create MVC Application using Visual studio ,folder structure will look like shown below:
The MVC separation helps you manage complex applications, because you can focus on one aspect a time. For example, you can focus on the view without depending on the business logic. It also makes it easier to test an application. The MVC separation also simplifies group development. Different developers can work on the view, the controller logic, and the business logic in parallel.
What is MVP pattern?
This pattern is similar to MVC pattern in which controller has been replaced by the presenter. This design pattern splits an application into three main aspects: Model, View and Presenter.
-
Model - The Model represents a set of classes that describes the business logic and data. It also defines business rules for data means how the data can be changed and manipulated.
-
View - The View represents the UI components like CSS, jQuery, html etc. It is only responsible for displaying the data that is received from the presenter as the result. This also transforms the model(s) into UI.
-
Presenter - The Presenter is responsible for handling all UI events on behalf of the view. This receive input from users via the View, then process the user's data with the help of Model and passing the results back to the View. Unlike view and controller, view and presenter are completely decoupled from each other’s and communicate to each other’s by an interface.
Also, presenter does not manage the incoming request traffic as controller.
This pattern is commonly used with ASP.NET Web Forms applications which require to create automated unit tests for their code-behind pages. This is also used with windows forms.
Key Points about MVP Pattern
-
User interacts with the View.
-
There is one-to-one relationship between View and Presenter means one View is mapped to only one Presenter.
-
View has a reference to Presenter but View has not reference to Model.
-
Provides two way communication between View and Presenter.
What is MVVM pattern?
MVVM stands for Model-View-View Model. This pattern supports two-way data binding between view and View model. This enables automatic propagation of changes, within the state of view model to the View. Typically, the view model uses the observer pattern to notify changes in the view model to model.
-
Model - The Model represents a set of classes that describes the business logic and data. It also defines business rules for data means how the data can be changed and manipulated.
-
View - The View represents the UI components like CSS, jQuery, html etc. It is only responsible for displaying the data that is received from the controller as the result. This also transforms the model(s) into UI.
-
View Model - The View Model is responsible for exposing methods, commands, and other properties that helps to maintain the state of the view, manipulate the model as the result of actions on the view, and trigger events in the view itself.
This pattern is commonly used by the WPF, Silverlight, Caliburn, nRoute etc.
Key Points about MVVM Pattern
-
User interacts with the View.
-
There is many-to-one relationship between View and ViewModel means many View can be mapped to one ViewModel.
-
View has a reference to ViewModel but View Model has no information about the View.
- Supports two-way data binding between View and ViewModel.
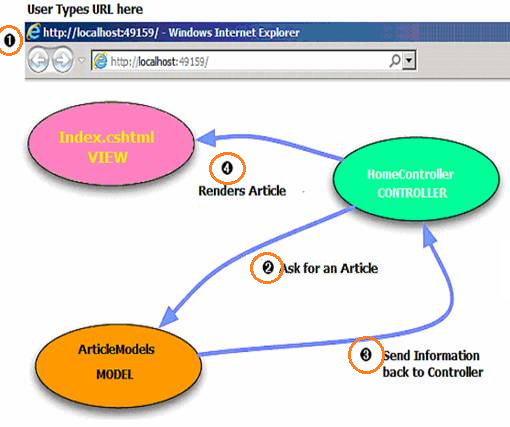
Complete flow of MVC?
To understand the the power of MVC you need to understand the Life Cycle, I could go in to great detail about the ASP.NET Life cycle, but I have found a number of very good articles already providing good amount of information on the Life Cycle. Before going to the pages here is a simple flow diagram of the steps the MVC process goes through
Below are the steps how control flows in MVC (Model, view and controller) architecture:-
- All end user requests are first sent to the controller.
- The controller depending on the request decides which model to load. The controller loads the model and attaches the model with the appropriate view.
- The final view is then attached with the model data and sent as a response to the end user on the browser.
ASP.NET MVC represents a simpler, more testable framework for developing web applications in Microsoft .NET.When people reference the acronym MVC, they are most likely referring to the software design pattern. Model-View-Controller is a user interface design pattern that separates display , data, and flow of control into different objects The view represents the screen and user input, the controller acts to coordinate the input/output from the view, and the model is the data structure that is passed between the two as shown in below figure 1. The pattern helps separate the display, interaction, and data logic.
Web Forms vs MVC
The MVC programming model is a lighter alternative to traditional ASP.NET (Web Forms). It is a lightweight, highly testable framework, integrated with all existing ASP.NET features, such as Master Pages, Security, and Authentication.
Visual Studio Express 2012/2010
Visual Studio Express is a free version of Microsoft Visual Studio. Visual Studio Express is a development tool tailor made for MVC (and Web Forms). Visual Studio Express contains:
- MVC and Web Forms
- Drag-and-drop web controls and web components
- A web server language (Razor using VB or C#)
- A web server (IIS Express)
- A database server (SQL Server Compact)
- A full web development framework (ASP.NET)
If you install Visual Studio Express, you will get more benefits from this tutorial. If you want to install Visual Studio Express, click on one of these links: Visual Web Developer 2012 (If you have Windows 7 or Windows 8) Visual Web Developer 2010 (If you have Windows Vista or XP)
 |
After you have installed Visual Studio Express the first time, it pays to run the installation one more time, to install fixes and service packs. Just click on the link once more. |
|---|
To learn ASP.NET MVC, we will Build an Internet Application
Part I: Creating the ApplicationWhat We Will Build
We will build an Internet application that supports adding, editing, deleting, and listing of information stored in a database.What We Will Do
Visual Web Developer offers different templates for building web applications. We will use Visual Web Developer to create an empty MVC Internet application with HTML5 markup. When the empty Internet application is created, we will gradually add code to the application until it is fully finished. We will use C# as the programming language, and the newest Razor server code markup. Along the way we will explain the content, the code, and all the components of the application.Creating the Web Application
If you have Visual Web Developer installed, start Visual Web Developer and select New Project. Otherwise just read and learn.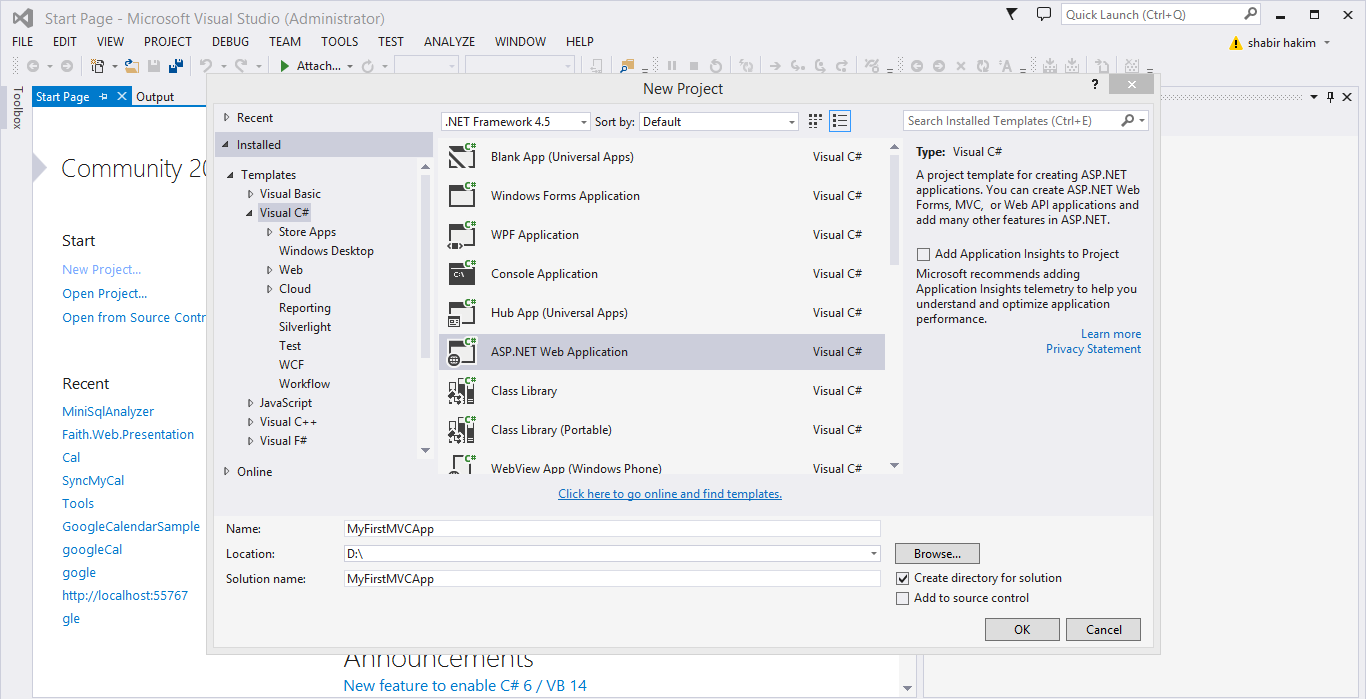
In the New Project dialog box:
- Open the Visual C# templates
- Select the template ASP.NET MVC 3 Web Application
- Set the project name to MvcDemo
- Set the disk location to something like c:\shabirhakim.net_demo
- Click OK
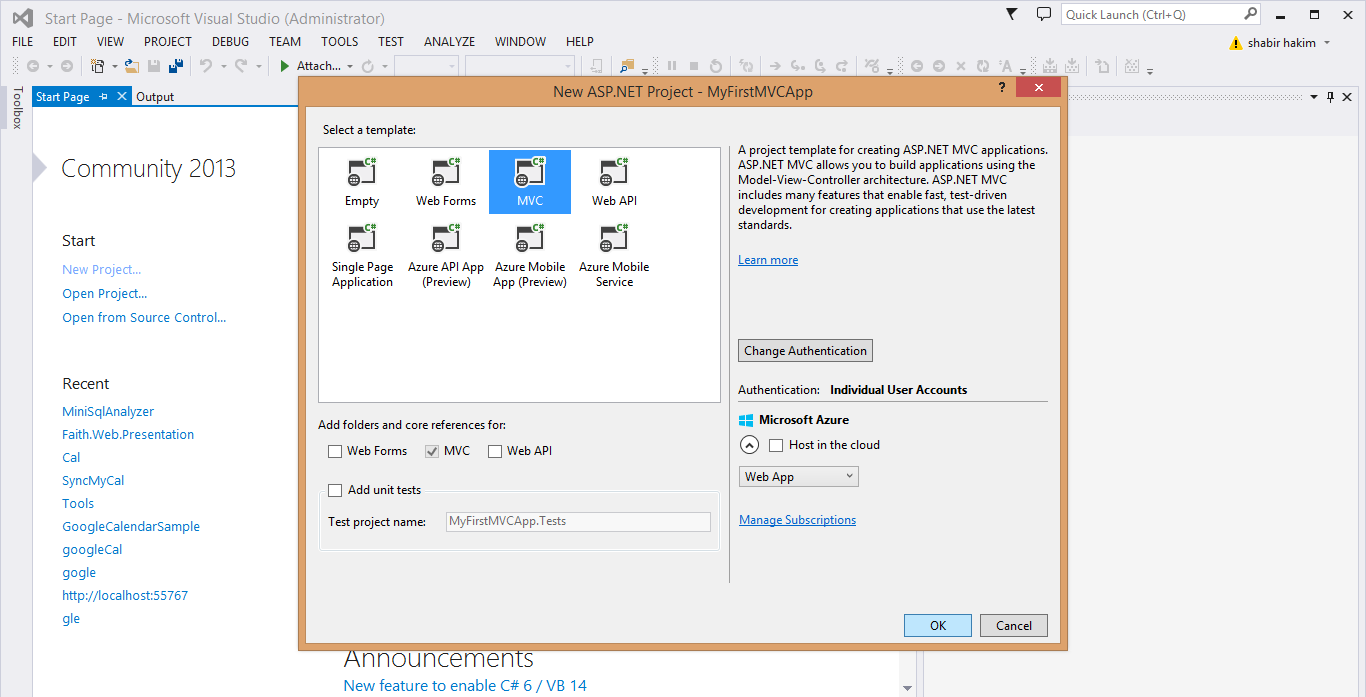
When the New Project Dialog Box opens
- Select the Internet Application template
- Select the Razor Engine
- Select HTML5 Markup
- Click OK
We will explore the content of the files and folders in the next chapter of this tutorial.
Part II: Exploring the Application
MVC Folders
A typical ASP.NET MVC web application has the following folder content:
|
The folder names are equal in all MVC applications. The MVC framework is based on default naming. Controllers are in the Controllers folder, Views are in the Views folder, and Models are in the Models folder. You don't have to use the folder names in your application code. Standard naming reduces the amount of code, and makes it easier for developers to understand MVC projects. Below is a brief summary of the content of each folder:
The App_Data Folder
The App_Data folder is for storing application data. We will add an SQL database to the App_Data folder, later in this tutorial. If your application is using data from server or any other source , you can remove this. This folder is required when you want database file independently reside in your application.
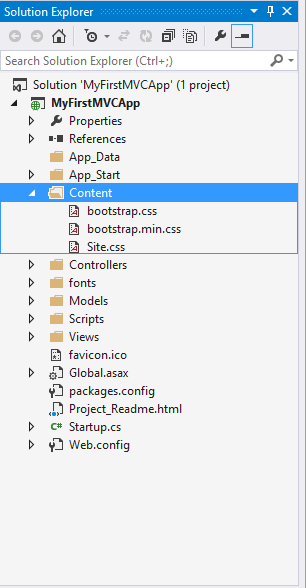
The Content Folder
The Content folder is used for static files like style sheets (css files), icons and images. Visual Web Developer automatically adds a themes folder to the Content folder. The themes folder is filled with jQuery styles and pictures. In this project you can delete the themes folder. Visual Web Developer also adds a standard style sheet file to the project: the file Site.css in the content folder. The style sheet file is the file to edit when you want to change the style of the application.
We will edit the style sheet file (Site.css) file in the next chapter of this tutorial.
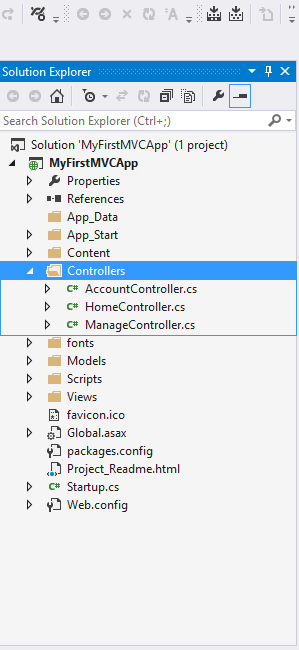
The Controllers Folder
The Controllers folder contains the controller classes responsible for handling user input and responses. MVC requires the name of all controller files to end with "Controller". Visual Web Developer has created a Home controller (for the Home and the About page) and an Account controller (for Login pages):
We will create more controllers later in this tutorial.
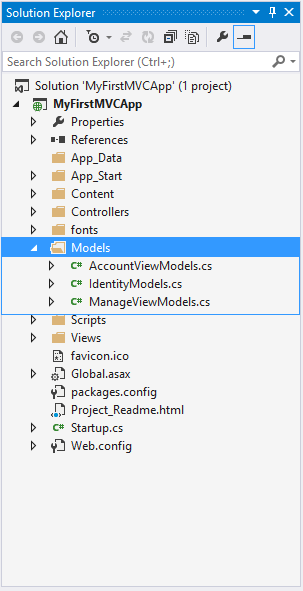
The Models Folder
The Models folder contains the classes that represent the application models. Models hold and manipulate application data.like shown below with sample/default classes
We will create models (classes) in a later chapter of this tutorial.
The Views Folder
The Views folder stores the HTML files related to the display of the application (the user interfaces). The Views folder contains one folder for each controller. Visual Web Developer has created an Account folder, a Home folder, and a Shared folder (inside the Views folder). The Account folder contains pages for registering and logging in to user accounts. The Home folder is used for storing application pages like the home page and the about page. The Shared folder is used to store views shared between controllers (master pages and layout pages).

We will edit the layout files in the next chapter of this tutorial.
The Scripts Folder
The Scripts folder stores the JavaScript files of the application. By default Visual Web Developer fills this folder with standard MVC, Ajax, and jQuery files:
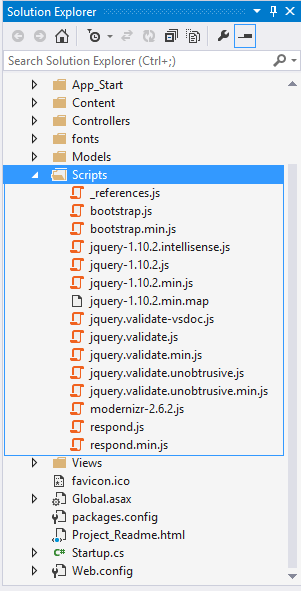
Note: The files named "modernizr" are JavaScript files used for supporting HTML5 and CSS3 features in the application.
Part III: Adding Styles and a Consistent Look (Layout).
Adding a Layout
The file _Layout.cshtml represent the layout of each page in the application. It is located in the Shared folder inside the Views folder. Open the file and swap the content with this:
<!DOCTYPE html>
<html>
<head>
<meta charset="utf-8" />
<title>@ViewBag.Title</title>
<link href="@Url.Content("~/Content/Site.css")" rel="stylesheet" type="text/css" />
<script src="@Url.Content("~/Scripts/jquery-1.5.1.min.js")"></script>
<script src="@Url.Content("~/Scripts/modernizr-1.7.min.js")"></script>
</head>
<body>
<ul id="menu">
<li>@Html.ActionLink("Home", "Index", "Home")</li>
<li>@Html.ActionLink("articles", "Index", "articles")</li>
<li>@Html.ActionLink("About", "About", "Home")</li>
</ul>

<section id="main">
@RenderBody()
<p>Copyright shabirhakim.net 2012. All Rights Reserved.</p>
</section>
</body>
</html>
HTML Helpers
In the code above, HTML helpers are used to modify HTML output: @Url.Content() - URL content will be inserted here. @Html.ActionLink() - HTML link will be inserted here.
HTML helpers are methods you can invoke on the Html property of a view. You also have access to URL helpers (via the Url property), and Ajax helpers (via the Ajax property). All these helpers have the same goal: to make views easy to author. The URL helper is also available from within the controller. Most of the helpers, particularly the HTML helpers, output HTML markup. For example, the BeginForm helper you saw earlier is a helper you can use to build a robust form tag for your search form, but without using lines and lines of code:
 @using (Html.BeginForm("Search", "Home", FormMethod.Get)) {
   <input name="q" type="text" />
  <input type="submit" value="Search" /> }
Chances are the BeginForm helper will output the same markup you had previously when you first implemented the search form. However, behind the scenes the helper is coordinating with the routing engine to generate a proper URL, so the code is more resilient to changes in the application deployment location. Note the BeginForm helper outputs both the opening <form> and the closing </form>. The helper emits the opening tag during the call to BeginForm, and the call returns an object implementing IDisposable. When execution reaches the closing curly brace of the using statement in the view, the helper emits the closing tag, thanks to the implicit call to Dispose. The using trick makes the code simpler and elegant. For those who fi nd it completely distasteful, you can also use the following approach, which provides a bit of symmetry:
@{Html.BeginForm("Search", "Home", FormMethod.Get);}
   <input name="q" type="text" />
<input type="submit" value="Search" /> }
@{Html.EndForm();}
Razor Syntax
In the code above, the code marked red are C# using Razor markup. @ViewBag.Title - The page title will be inserted here. @RenderBody() - The page content will be rendered here.
Adding Styles
The style sheet for the application is called Site.css. It is located in the Content folder. Open the file Site.css and swap the content with this:
body
{
font: "Trebuchet MS", Verdana, sans-serif;
background-color: #5c87b2;
color: #696969;
}
h1
{
border-bottom: 3px solid #cc9900;
font: Georgia, serif;
color: #996600;
}
#main
{
padding: 20px;
background-color: #ffffff;
border-radius: 0 4px 4px 4px;
}
a
{
color: #034af3;

}
/* Menu Styles ------------------------------*/

ul#menu
{
padding: 0px;
position: relative;
margin: 0;
}
ul#menu li
{
display: inline;
}
ul#menu li a

{
background-color: #e8eef4;
padding: 10px 20px;
text-decoration: none;
line-height: 2.8em;
/*CSS3 properties*/
border-radius: 4px 4px 0 0;
}
ul#menu li a:hover
{
background-color: #ffffff;
}

/* Forms Styles ------------------------------*/

fieldset
{
padding-left: 12px;
}

fieldset label
{
display: block;
padding: 4px;
}
input[type="text"], input[type="password"]
{
width: 300px;
}
input[type="submit"]
{
padding: 4px;
}
/* Data Styles ------------------------------*/

table.data
{
background-color:#ffffff;
border:1px solid #c3c3c3;
border-collapse:collapse;
width:100%;
}
table.data th
{
background-color:#e8eef4;
border:1px solid #c3c3c3;
padding:3px;
}
table.data td

{
border:1px solid #c3c3c3;
padding:3px;
}
The _ViewStart File
The _ViewStart file in the Shared folder (inside the Views folder) contains the following content:
@{Layout = "~/Views/Shared/_Layout.cshtml";}
This code is automatically added to all views displayed by the application. If you remove this file, you must add this line to all views. You will learn more about views in a later chapter of this tutorial. Part IV: Adding a Controller.
The Controllers Folder
The Controllers Folder contains the controller classes responsible for handling user input and responses. MVC requires the name of all controllers to end with "Controller". In our example, Visual Web Developer has created the following files: HomeController.cs (for the Home and About pages) and AccountController.cs (For the Log On pages):
Web servers will normally map incoming URL requests directly to disk files on the server. For example: a URL request like "http://www.shabirhakim.net/default.asp" will map directly to the file "default.asp" at the root directory of the server. The MVC framework maps differently. MVC maps URLs to methods. These methods are in classes called "Controllers". Controllers are responsible for processing incoming requests, handling input, saving data, and sending a response to send back to the client.
The Home controller
The controller file in our application HomeController.cs, defines the two controls Index and About. Swap the content of the HomeController.cs file with this:
using System;
using System.Collections.Generic;

using System.Web;
using System.Web.Mvc;

namespace MvcDemo.Controllers
{
public class HomeController : Controller
{
public ActionResult Index()
{return View();}

public ActionResult About()
{return View();}
}
}
The Controller Views
The files Index.cshtml and About.cshtml in the Views folder defines the ActionResult views Index() and About() in the controller.
Part V: Adding Views for Displaying the Application.
The Views Folder
The Views folder stores the files (HTML files) related to the display of the application (the user interfaces). These files may have the extensions html, asp, aspx, cshtml, and vbhtml, depending on the language content. The Views folder contains one folder for each controller. Visual Web Developer has created an Account folder, a Home folder, and a Shared folder (inside the Views folder). The Account folder contains pages for registering and logging in to user accounts. The Home folder is used for storing application pages like the home page and the about page. The Shared folder is used to store views shared between controllers (master pages and layout pages).
Each controller folder contains a view file for each action method, and the file is named the same as the action method. This provides the basis for how views are associated to an action method. The view selection logic looks for a view with the same name as the action within the /Views/ ControllerName directory (the controller name without the Controller suffi x in this case). The view selected in this case would be /Views/Home/Index.cshtml.
As with most things in ASP.NET MVC, you can override this convention. Suppose that you want the Index action to render a different view. You could supply a different view name, as follows:
public ActionResult Index()
 { return View("NotIndex"); }
In this case, it will still look in the /Views/Home directory, but choose NotIndex.cshtml as the view. In some situations, you might even want to specify a view in a completely different directory structure. You can use the tilde syntax to provide the full path to the view, as follows:
 public ActionResult Index()
 { return View("~/Views/Example/Index.cshtml");
  }
When using the tilde syntax, you must supply the file extension of the view because this bypasses the view engine’s internal lookup mechanism for finding views.
ADDING A VIEW
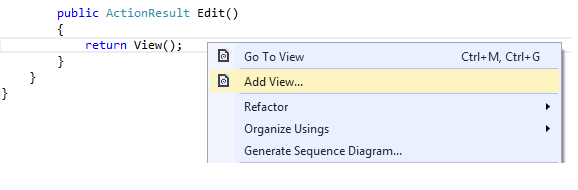
In the “View Basics” and “View Conventions” sections you learned how a controller specifi es a view. But how does that view get created in the first place? You could certainly create a file by hand and add it to your Views directory, but the ASP.NET MVC tooling for Visual Studio makes adding a view using the Add View dialog very easy. The easiest way to display the Add View dialog is to right-click in an action method. You can use any action method you’d like; for this example you can just add a new action method named Edit and then create a view for that action using the Add View dialog. Begin by adding an Edit action method to the HomeController in an MVC 5 application that contains the following code:
public ActionResult Edit() { return View(); }
Next, launch the Add View dialog by right-clicking an action method and selecting Add View (see Figure 3-4)
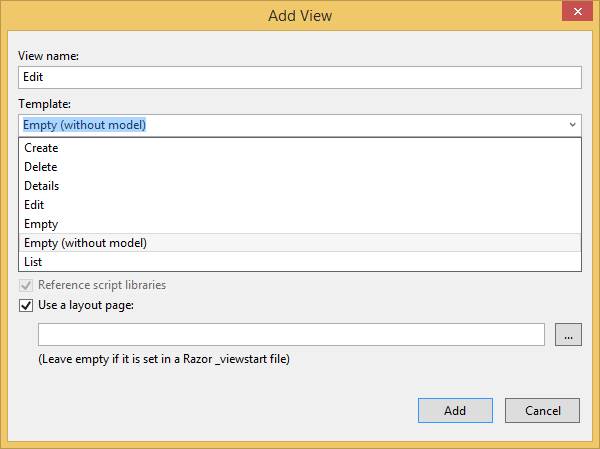
This brings up the Add View dialog, as shown in Figure 3-5. The following list describes each menu item in detail: ➤ View name: When launching this dialog from the context of an action method, the view name is prepopulated using the name of the action method. Naturally, the view name is required. ➤ Template: After you select a type, you can also choose a scaffold template. These templates use the Visual Studio templating system to generate a view based on the model type selected. The templates are shown in Figure 3-6 and explained in Table 3-1.

ASP.NET File Types
The following HTML file types can be found in the Views Folder:
| File Type | Extention |
|---|---|
| Plain HTML | .htm or .html |
| Classic ASP | .asp |
| Classic ASP.NET | .aspx |
| ASP.NET Razor C# | .cshtml |
| ASP.NET Razor VB | .vbhtml |
The Index File
The file Index.cshtml represents the Home page of the application. It is the application's default file (index file). Put the following content in the file:
@{ViewBag.Title = "Home Page";}

<h1>Welcome to shabirhakim.net</h1>

<p>Put Home Page content here</p>
The About File
The file About.cshtml represent the About page of the application. Put the following content in the file:
@{ViewBag.Title = "About Us";}

<h1>About Us</h1>

<p>Put About Us content here</p>
Run the Application
Select Debug, Start Debugging (or F5) from the Visual Web Developer menu. Your application will look like this:
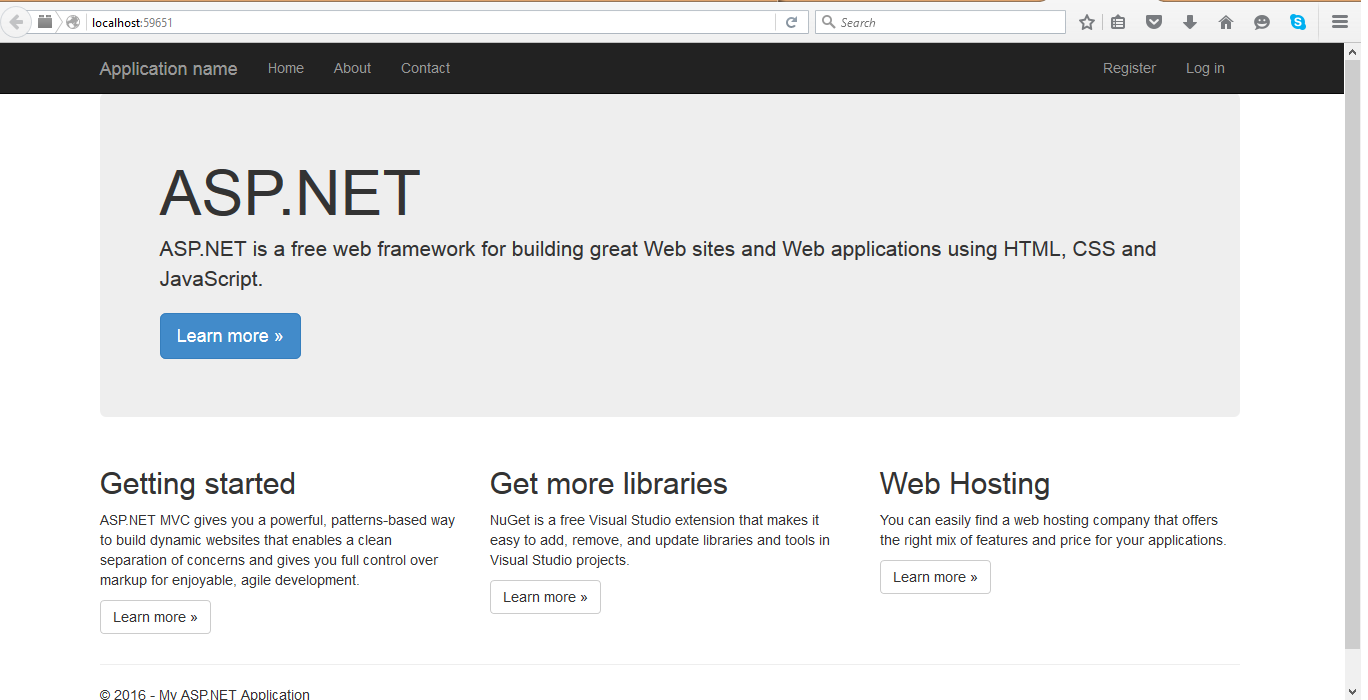
Click on the "Home" tab and the "About" tab to see how it works.
SUCESS
Great. You have created your first MVC Application
Adding a Database.
Creating the Database
Visual Web Developer comes with a free SQL database called SQL Server Compact. The database needed for this tutorial can be created with these simple steps:
- Right-click the App_Data folder in the Solution Explorer window
- Select Add, New Item
- Select SQL Server Compact Local Database *
- Name the database Users.sdf.
- Click the Add button
* If SQL Server Compact Local Database is not an option, you have not installed SQL Server Compact on your computer. Install it from this link: SQL Server Compact Visual Web Developer automatically creates the database in the App_Data folder. Note: In this tutorial it is expected that you have some knowledge about SQL databases. If you want to study this topic first, please visit our SQL Tutorial.
Adding a Database Table
Adding Database Records
You can use Visual Web Developer to add some test records to the FaithDb database. Double-click the FaithDb.mdb file in the App_Data folder. Right-click the FaithDb table in the Database Explorer window and select Show Table Data. Add some records:
MVC Models
The MVC Model contains all application logic (business logic, validation logic, and data access logic), except pure view and controller logic. With MVC, models both hold and manipulate application data.
The Models Folder
The Models Folder contains the classes that represent the application model. Visual Web Developer automatically creates an AccountModels.cs file that contains the models for application security. AccountModels contains a LogOnModel, a ChangePasswordModel, and a RegisterModel.Adding a Database Model
The database model needed for this tutorial can be created with these simple steps:- In the Solution Explorer, right-click the Models folder, and select Add and Class.
- Name the class articleDB.cs, and click Add.
Adding a Database Controller
The database controller needed for this tutorial can be created with these simple steps:- Re-Build your project: Select Debug, and then Build MvcDemo from the menu.
- In the Solution Explorer, right-click the Controllers folder, and select Add and Controller
- Set controller name to articlesController
- Select template: Controller with read/write actions and views, using Entity Framework
- Select model class: articleDB (MvcDemo.Models)
- Select data context class: articleDBContext (MvcDemo.Models)
- Select views Razor (CSHTML)
- Click Add
- A articlesController.cs file in the Controllers folder
- A articles folder in the Views folder
Adding Database Views
The following files are automatically created in the articles folder:- Create.cshtml
- Delete.cshtml
- Details.cshtml
- Edit.cshtml
- Index.cshtml
Adding a Connection String
Congratulations
Congratulations. You have added your first MVC data model to your application. Now you can click on the "articles" tab :-)MVC Application Security
The Models Folder contains the classes that represent the application model. Visual Web Developer automatically creates an AccountModels.cs file that contains the models for application authentication. AccountModels contains a LogOnModel, a ChangePasswordModel, and a RegisterModel:
The Change Password Model
public class ChangePasswordModel
{

[Required]
[DataType(DataType.Password)]
[Display(Name = "Current password")]
public string OldPassword { get; set; }

[Required]
[StringLength(100, ErrorMessage = "The {0} must be at least {2}      characters long.", MinimumLength = 6)]
[DataType(DataType.Password)]
[Display(Name = "New password")]
public string NewPassword { get; set; }

[DataType(DataType.Password)]
[Display(Name = "Confirm new password")]
[Compare("NewPassword", ErrorMessage = "The new password and confirmation password do not match.")]
public string ConfirmPassword { get; set; }

}
The Logon Model
public class LogOnModel
{

[Required]
[Display(Name = "User name")]
public string UserName { get; set; }

[Required]
[DataType(DataType.Password)]
[Display(Name = "Password")]
public string Password { get; set; }

[Display(Name = "Remember me?")]
public bool RememberMe { get; set; }

}
The Register Model
public class RegisterModel
{

[Required]
[Display(Name = "User name")]
public string UserName { get; set; }

[Required]
[DataType(DataType.EmailAddress)]
[Display(Name = "Email address")]
public string Email { get; set; }

[Required]
[StringLength(100, ErrorMessage = "The {0} must be at least {2} characters long.", MinimumLength = 6)]
[DataType(DataType.Password)]
[Display(Name = "Password")]
public string Password { get; set; }

[DataType(DataType.Password)]
[Display(Name = "Confirm password")]
[Compare("Password", ErrorMessage = "The password and confirmation password do not match.")]
public string ConfirmPassword { get; set; }

}
HTML Helpers are used to modify HTML output
HTML Helpers
With MVC, HTML helpers are much like traditional ASP.NET Web Form controls. Just like web form controls in ASP.NET, HTML helpers are used to modify HTML. But HTML helpers are more lightweight. Unlike Web Form controls, an HTML helper does not have an event model and a view state. In most cases, an HTML helper is just a method that returns a string. With MVC, you can create your own helpers, or use the built in HTML helpers.Standard HTML Helpers
MVC includes standard helpers for the most common types of HTML elements, like HTML links and HTML form elements.HTML Links
The easiest way to render an HTML link in is to use the HTML.ActionLink() helper. With MVC, the Html.ActionLink() does not link to a view. It creates a link to a controller action. Razor Syntax:
@Html.ActionLink("About this Website", "About")
ASP Syntax:
<%=Html.ActionLink("About this Website", "About")%>
The first parameter is the link text, and the second parameter is the name of the controller action.
The Html.ActionLink() helper above, outputs the following HTML:
| Property | Description |
|---|---|
| .linkText | The link text (label) |
| .actionName | The target action |
| .routeValues | The values passed to the action |
| .controllerName | The target controller |
| .htmlAttributes | The set of attributes to the link |
| .protocol | The link protocol |
| .hostname | The host name for the link |
| .fragment | The anchor target for the link |
@Html.ActionLink("Edit Record", "Edit", new {Id=3})
Razor Syntax VB:
@Html.ActionLink("Edit Record", "Edit", New With{.Id=3})
The Html.ActionLink() helper above, outputs the following HTML:
HTML Form Elements
There following HTML helpers can be used to render (modify and output) HTML form elements:- BeginForm()
- EndForm()
- TextArea()
- TextBox()
- CheckBox()
- RadioButton()
- ListBox()
- DropDownList()
- Hidden()
- Password()
<%= Html.ValidationSummary("Create was unsuccessful. Please correct the errors and try again.") %>
<% using (Html.BeginForm()){%>
<p>
<label for="FirstName">First Name:</label>
<%= Html.TextBox("FirstName") %>
<%= Html.ValidationMessage("FirstName", "*") %>
</p>
<p>
<label for="LastName">Last Name:</label>
<%= Html.TextBox("LastName") %>
<%= Html.ValidationMessage("LastName", "*") %>
</p>
<p>
<label for="Password">Password:</label>
<%= Html.Password("Password") %>
<%= Html.ValidationMessage("Password", "*") %>
</p>
<p>
<label for="Password">Confirm Password:</label>
<%= Html.Password("ConfirmPassword") %>
<%= Html.ValidationMessage("ConfirmPassword", "*") %>
</p>
<p>
<label for="Profile">Profile:</label>
<%= Html.TextArea("Profile", new {cols=60, rows=10})%>
</p>
<p>
<%= Html.CheckBox("ReceiveNewsletter") %>
<label for="ReceiveNewsletter" style="display:inline">Receive Newsletter?</label>
</p>
<p>
<input type="submit" value="Register" />
</p>
<%}%>
For below explanation i will be using Database First Model.Before i start creating model i just want to say that there are three approaches to using Entity Framework (EF) – Model First, Database First and Code First. Here you see the explanation of each.
Database First :In the database first approach, we are creating the entity framework from an existing database. We use all other functionality, such as the model/database sync and the code generation, in the same way we used them in the Model First approach
Model First:
In the Model First approach, the database model is created first using the ORM designer in Visual Studio. Once the model consisting of entities and relationships has been designed, the physical database will be generated from the model.
Code First:In Code-First Approach, we create the classes first and then generate the database from the classes directly. In code first, we won’t use the Entity Designer (for editing .edmx files) at all.
when should one choose one method over the others? Here is a simple comparison of the advantages all three approaches. Fact is that all three approaches lead to creation of Model and using any of these approaches is just matter of taste
Model First:
- Good support with EDMX designer
- We can visually create the database model
- EF generates the Code and database script
- Extensible through partial classes
- We can modify the model and update the generated database.
Database First:
- An existing database can be used
- Code can be auto-generated.
- Extensible using partial classes/ T4 templates
- The developer can update the database manually
- There is a very good designer, which sync with the underlining database
Code First:
- There is full control of the model from the Code; no EDMX/designer
- No manual intervention to DB is required
- The database is used for data only
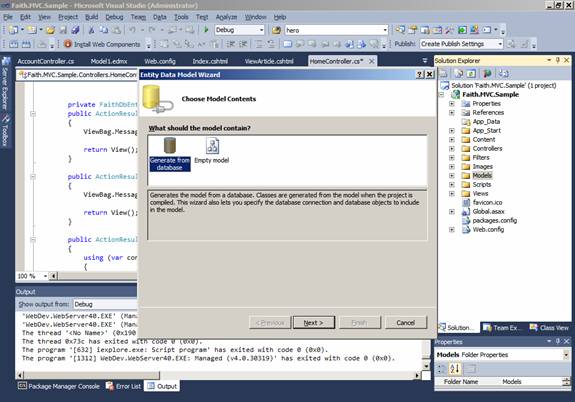
ADD ADO.NET ENTITY DATA MODEL
|
Right Click on Model Folder of the solution explorer and Click on Add-> New Item like show below.Fallow all the steps as shown |
 |
 |
 |
 |
| Here You can choose existing connection from dropdownlist or just create new connection. If New Connection is clicked then you will see below screen |
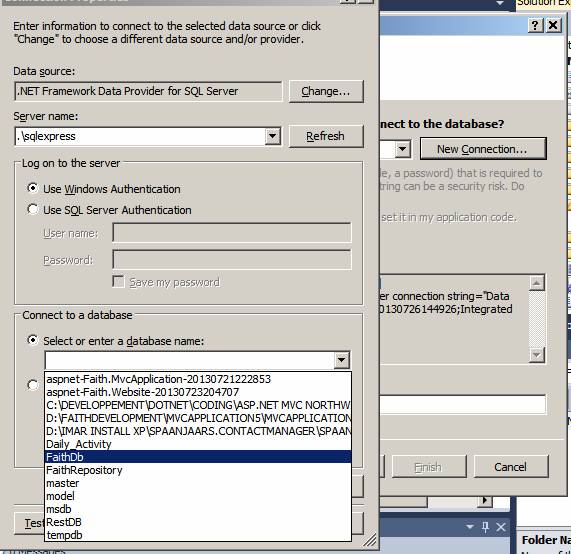 |
| After Selecting database just Click on Test Connection button .if you get message like connection succeed like below then proceed |
 |
 |
Select tables you want to include in Model.My case I have selected checked tables

|
| Next you will see you model like shown below |
 |
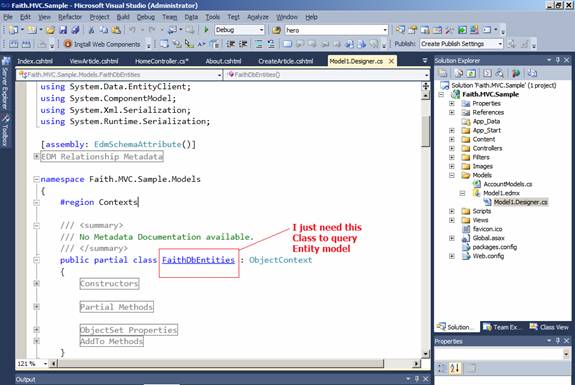 |
| Now you can dive into Model1.Designer.cs and see how Entity Framework has generated data access code for you without writing a single line of code.For now we will not touch this model except remembering ObjectContext Class Name which is FaithDbEntities as shown above.We will use this model as is; because we just want to see how MVC Application works . |
Adding Controller |
|
Adding Controller is just simple .You just need to Right click on Controller folder and add New class as shown below or you can use existing/default HomeController |
 |
Adding View |
|
Create Folder with Article name and Right Click on it to Add View like shown below |
 |
 |
| Recapping whole Example Controller, Model, and View Code |
| ArticleController: |
using System;
using System.Collections.Generic;
using System.Linq;
using System.Web;
using System.Web.Mvc;
using System.Data;
using Faith.MVC.DAL;
namespace Faith.MVC.Sample.Controllers
{
public class ArticleController : Controller
{
private FaithDbEntities _dbContext = new FaithDbEntities();
public Article CurrentArticle { get; set; }
// GET: /Article/
public ActionResult ArticleHome()
{
return View();
}
[HttpPost]
public ActionResult CreateArticle(Article entry)
{
entry.ArticlePubsDate = DateTime.Now;
entry.AuthorId =1;//owner always will change in next iteration
_dbContext.Articles.AddObject(entry);
_dbContext.ArticleAuthors.Include("AuthorId");
_dbContext.SaveChanges();
return View("Created");
}
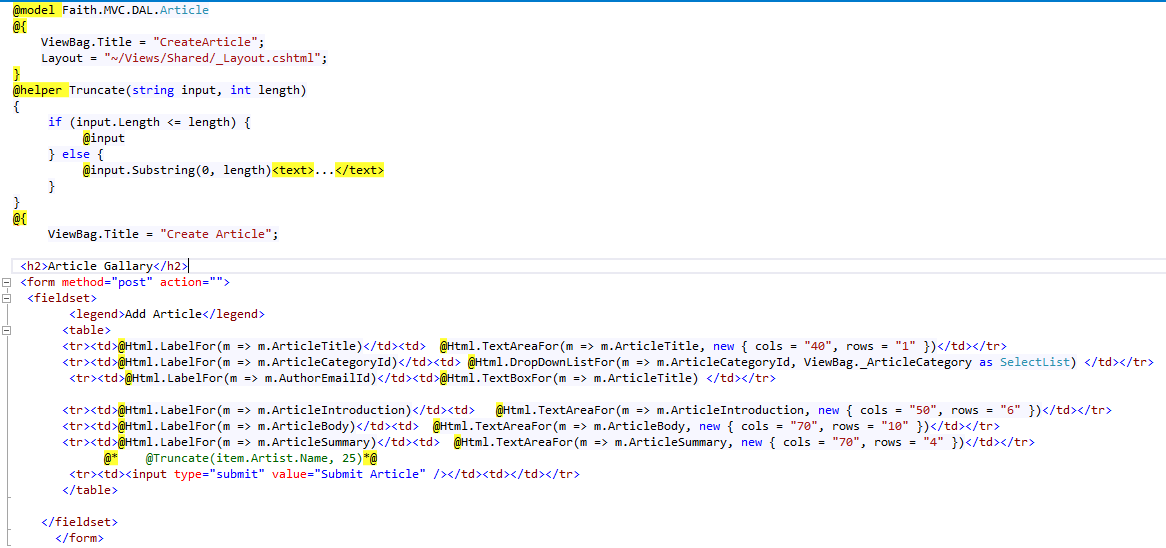
public ActionResult CreateArticle()
{
var articleCategoryData = _dbContext.ArticleCategories.ToList();
ViewData["_ArticleCategory"] = new SelectList(articleCategoryData, // items
"ArticleCategoryId", // dataValueField
"ArticleCategory1", // dataTextField
0);
return View();
}
[HttpPost]
public ActionResult EditArticle(Article entry)
{
if (ModelState.IsValid)
{
//_dbContext.Entry(entry).State = EntityState.Modified;
_dbContext.SaveChanges();
return RedirectToAction("Index");
}
return View(entry);
}
public ActionResult EditArticle(int id)
{
Article article = _dbContext.Articles.Single(d => d.ArticleId == id);
if (article == null)
{
return HttpNotFound();
}
var selectedvalue = article.ArticleCategoryId;
var articleCategoryData = _dbContext.ArticleCategories.ToList();
ViewData["_ArticleCategory"] = new SelectList(articleCategoryData, // items
"ArticleCategoryId", // dataValueField
"ArticleCategory1", // dataTextField
selectedvalue);
ViewData["Article"] = article;
return View(article);
}
public ActionResult ViewArticles()
{
using (var context = new Faith.MVC.DAL.FaithDbEntities())
{
return View(context.Articles.ToList());
}
}
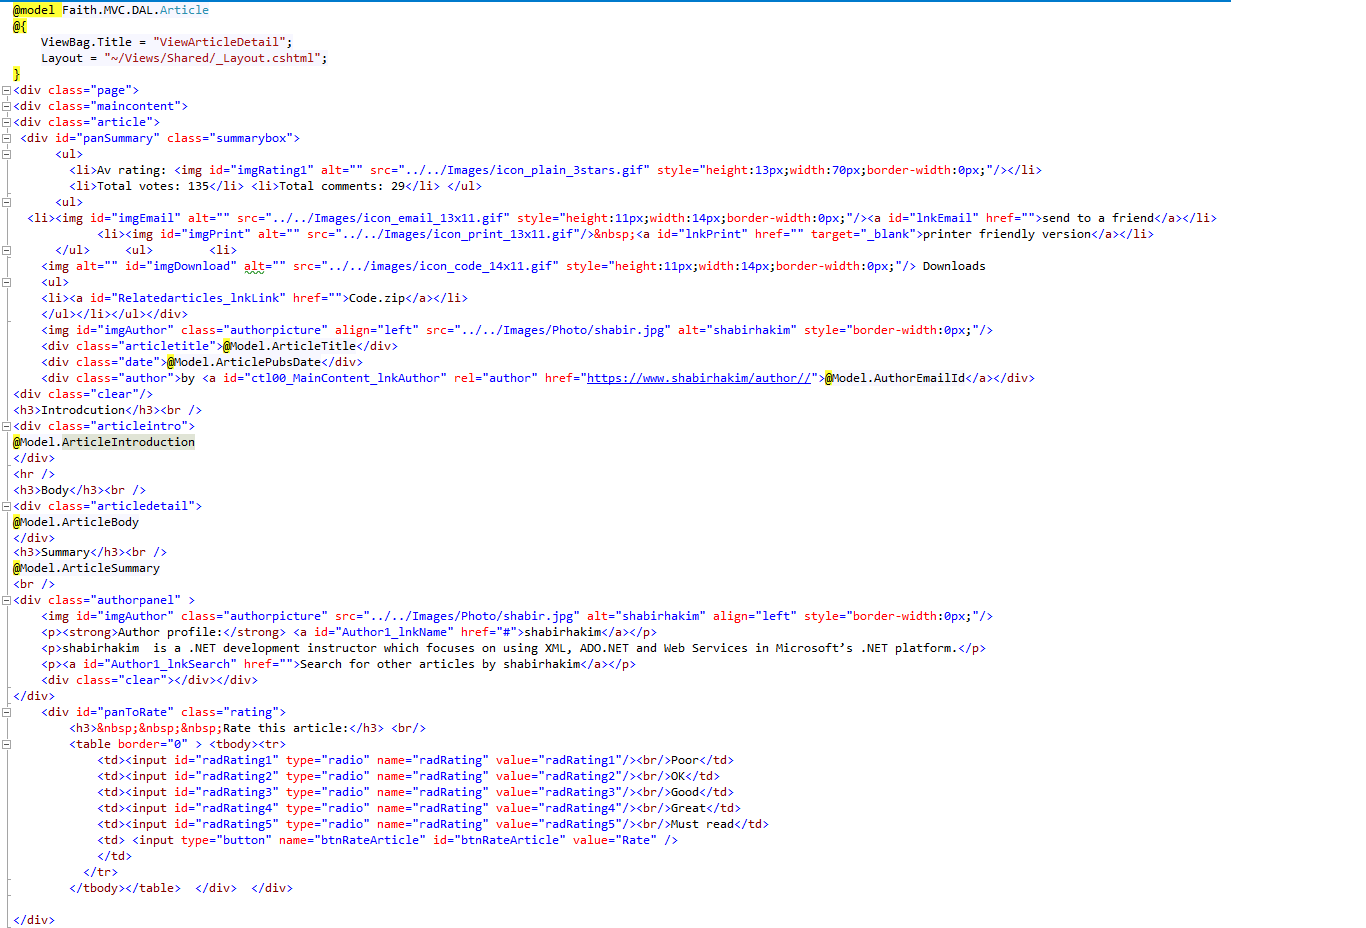
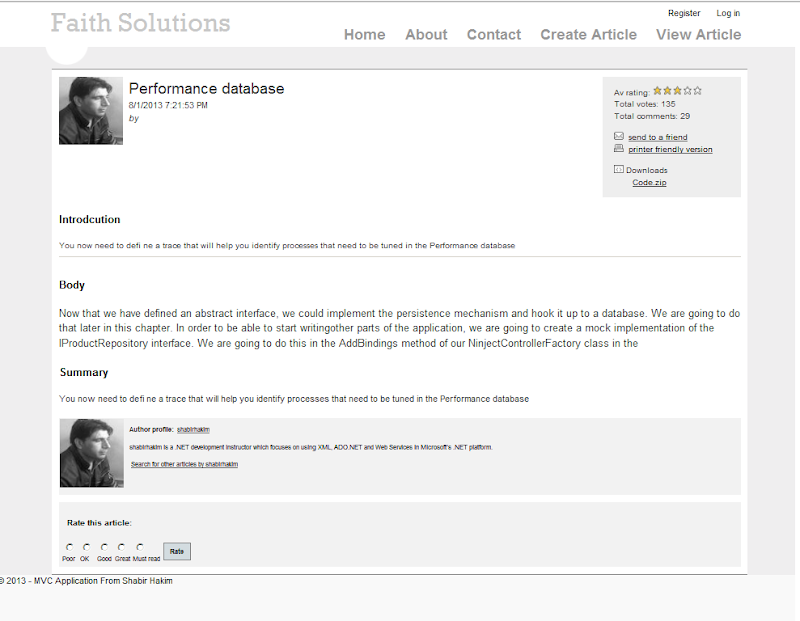
public ActionResult ViewArticleDetail(int id)
{
CurrentArticle = _dbContext.Articles.Single(d => d.ArticleId == id);
return View(CurrentArticle);
}
public ActionResult DeleteArticle(int id)
{
CurrentArticle = _dbContext.Articles.Single(d => d.ArticleId == id);
if (CurrentArticle == null)
return View("RecordNotFound");
Delete();
_dbContext.SaveChanges();
return View("Deleted");
}
[NonAction]
public void Delete()
{
try
{
_dbContext.Articles.DeleteObject(CurrentArticle);
_dbContext.SaveChanges();
}
catch (DataException ex)
{
throw ex;
}
}
public ActionResult SearchIndex(string articleTitle, string searchText)
{
var ArtLst = new List
|
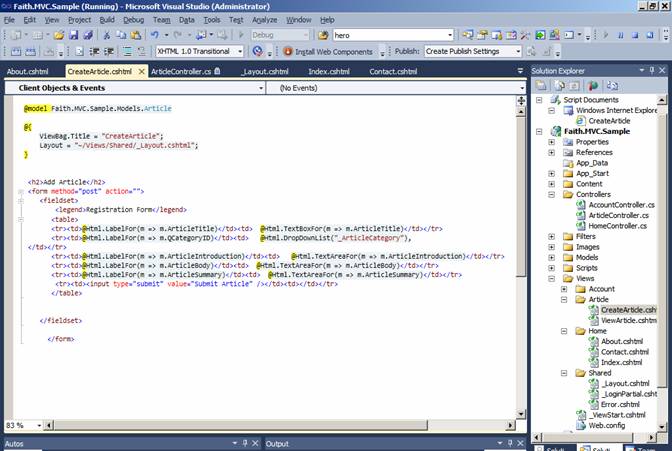
| CreateArticle.cshtml |
|
|
 |
 |
| ViewArticle.cshtml |
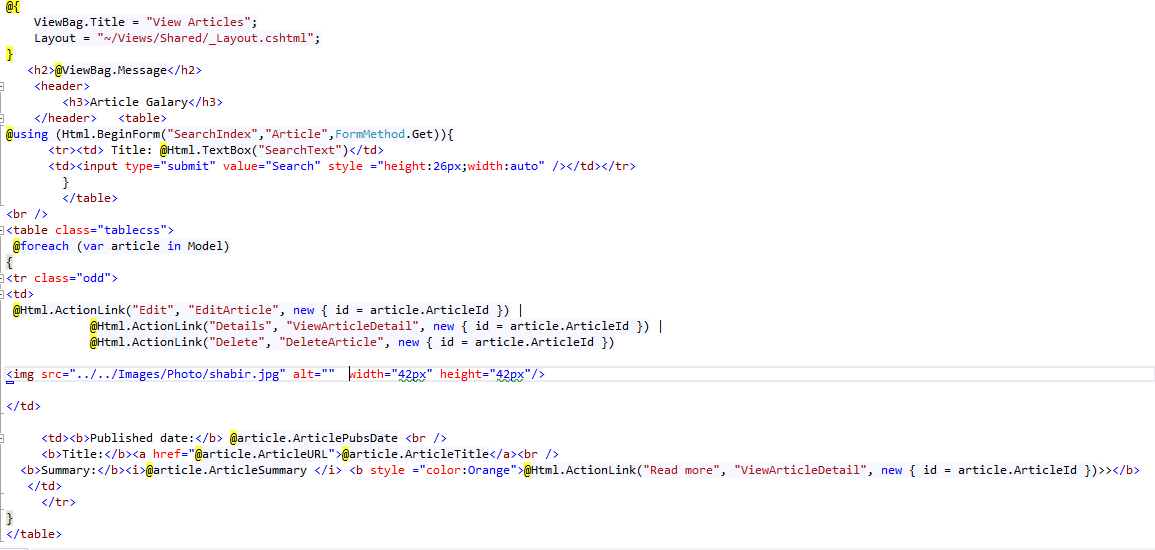
|
 |
| ViewArticleDetail.cshtml |
|
 |
Understanding MVC Conventions
There are two kinds of conventions in an MVC project. The first kind is really just suggestions as to how you might like to structure your project. For example, it is conventional to put your JavaScript files in the Scripts folder. This is where other MVC developers would expect to find them, and where Visual Studio puts the initial JavaScript files for a new MVC project. But you are free to rename the Scripts folder, or remove it entirely and put your scripts anywhere you like. That would not prevent the MVC Framework from running your application.The other kind of convention arises from the principle of convention over configuration, which was one of the main selling points that made Ruby on Rails so popular. Convention over configuration means that you don’t need to explicitly configure associations between controllers and their views, for example. You just follow a certain naming convention for your files, and everything just works. There is less flexibility in changing your project structure when dealing with this kind of convention. The following sections explain the conventions that are used in place of configuration.
Following Conventions for Controller ClassesController classes must have names that end with Controller, such as ProductController, AdminController, and HomeController. When referencing a controller from elsewhere in the project, such as when using an HTML helper method, you specify the first part of the name (such as Article), and the MVC Framework automatically appends Controller to the name and starts looking for the controller class.
Following Conventions for Views
Views and partial views go into the folder /Views/Controllername. For example, a view associated with the ProductController class would go in the /Views/Product folder. The MVC Framework expects that the default view for an action method should be named after that method. For example, the default view associated with an action method called List should be called List.cshtml. Thus, for the List activeness method in the ProductController class, the default view is expected to be /Views/Product/List.cshtml. The default view is used when you return the result of calling the View method in an action method,like this:
return View();
You can specify a different view by name, like this:
return View("MyOtherView");
Notice that we do not include the file name extension or the path to the view. When looking for a view, the MVC Framework looks in the folder named after the controller then in the /Views/Shared folder. This means that we can put views that will be used by more than one controller in the /Views/Shared folder and the framework will find them.
Following Conventions for LayoutsThe naming convention for layouts is to prefix the file with an underscore (_) character, and layout files are placed in the /Views/Shared folder. Visual Studio creates a layout called _Layout.cshtml when all but the Empty project template is used. This layout is applied to all views by default through the /Views/_ViewStart.cshtml file.If you do not want the default layout applied to views, you can change the settings in_ViewStart.cshtml (or delete the file entirely) to specify another layout in the view, like this:
@{ Layout = "~/Views/Shared/MyLayout.cshtml" } Or you
 can disable any layout for a given view, like this: @{ Layout = null; }
What Is a Persistence Framework?
A persistence framework is a library used to simplify accessing and storing information. In practice, this means how we write our code to communicate with the relational database management system (RDMS). The current trend in the industry is to use object-relational mapping (ORM) persistence frameworks. These are abstract things such as tables, columns, and rows, and they allow us to work primarily with objects. Popular open source ORMs for .NET include :
- NHibernate
- Entity Framework
- LINQ to SQL
Deciding Between MVC and Web Forms
Problem:
Organisations which are using web forms from several years. Suddenly shifting from webfarm to MVC will be bit tough and hasty decision because MVC has got steep learning curve and complexity in Solution architecturing.
I believe organisations need help deciding whether to stick with Web Forms or dive into MVC.
If MVC is not yet a standard development framework in your organization, you may need to justify
this design decision to management or an enterprise architecture team.
Decision:
Let us take detailed look at the advantages and disadvantages of each,and make the case for MVC.First, I have to say that Web Forms gave us a great and smooth run for long. I have used Web Forms on many successful projects.Many of them are still in active use almost five years subsequently they were initially deployed. So ,Fact is that WebForm are alive and will remain alive in market parallel to MVC because It has got huge advantages like its rich control support and rich server side event model.Reality is that No technology is perfect. They all have things they can do very well, and areas where they lack and can use improvement. This section takes an honest look Web Forms and MVC, and discusses the benefits and drawbacks of each.
Web Forms Disadvantages
- Hard and Tougest part is postbacks:
- ASP.NET controls are not as effective as modern client-side libraries:The large library of UI widgets that come with Web Forms, which seemed like such an asset a few years past, are also falling out of favor. The JavaScript UI libraries that are freely available from jQuery and others are just plain better than what is available in ASP.NET. They render faster, do not rely on the dreaded ASP.NET view state, and are beautiful. While many of the controls have been updated in the latest release of ASP.NET, most of them still use deprecated rending techniques such as using HTML tables for layouts. They are also difficult, if not impossible, to program against from client-side code.
- The cypher-behind pages often break separation of concerns:While a disciplined programmer can create clean code-behind pages, in many cases, developers break the separation of concerns by manipulating the user interface in the code-behind page, or even worse—directly manipulating the database from the cypher behind. This often leads to huge, fragile, unmaintainable, and untestable code.
- View State:Web Forms uses a concept known as view state, in which a hidden field contains the values of all server-side controls, encoded in a big nasty string. This data is sent on every postback, which slows response times and increases bandwidth usage. For pages that use controls such as a grid view, the view state can be hundreds of kilobytes.
- Client-side code is difficult to work with:The client-side cypher generated by Web Forms is difficult to read and very difficult to code against. First, each UI Widget that you drag onto a page is attached to a DLL with possibly 20 embedded script files. In many cases, using just one of these controls on a page will lead to all 20 of these scripts being included on your page in
- Another pain point for client-side developers is the machinelike naming convention used for client-side elementsWith the default setting, you get ids in the form of ctl00_LoginView1_LoginName1. For nested UI elements, it gets even worse. ASP.NET 4 offers a mechanism to aid in this situation by allowing you to specify how the client ID can be generated.
- Code-behind pages can't be tested with automated testing tools:Cypher-behind pages are simply not designed for this scenario. There is no easy way to abstract the code-behind pages so that a unit test framework can be used. If you were planning on using a test-driven development(TDD) approach with Web Forms, you will have a difficult time.
- Learning curve: If you are coming from Web Forms, there is a substantial learning curve associated with moving to MVC. Having to learn a new technology on a deadline is never simple nor can be achived easily.
- More complex: The MVC code separates the cypher that makes up a page into a minimum of three files. If you are not planning on doing unit testing, and don’t like HTML cryptography, MVC may not be the best option.I mean when development cycle includes test driven development TDD then MVC is the best choice otherwise it sucks..
- No drag-and-drop form creation: If you use the MVC Framework, you will be hand-coding your HTML. In fact, Visual Studio does not even offer a visual designer for MVC Views when using the Razor view engine. For most teams, the learning curve is hardest to move past. For Prototyping there is no support in Razor .
MVC Disadvantages
Difference between LINQ to SQL and Entity Framework
LINQ to SQL is an object-relational mapping (ORM) framework that allows the direct 1-1 mapping of a Microsoft SQL Server database to .NET classes, and query of the resulting objects using LINQ. More specifically, LINQ to SQL has been developed to target a rapid development scenario against Microsoft SQL Server where the database nearly resembles the application object model and the primary concern is increased developer productivity. LINQ2SQL was first released with C# 3.0 and .Net Framework 3.5.
- LINQ to SQL supports a wide breadth of abstractions
- LINQ to SQL support domain Model
- Linq to SQL is only for SQL
- LINQ to SQL is simple to use
- LINQ to SQL is used for rapid development.
- LINQ to SQL class uses the mapping only for the single table
- LINQ to SQL generate only dbml file
LINQ to Entities (ADO.Net Entity Framework) is an ORM (Object Relational Mapper) API which allows for a broad definition of object domain models and their relationships to many different ADO.Net data providers. As such, you can mix and match a number of different database vendors, application servers or protocols to design an aggregated mash-up of objects which are constructed from a variety of tables, sources, services, etc. TROUBLE.Net Framework was released with the .Net Framework 3.5 SP1.
- Entity framework supports a high level of abstraction.
- Entity framework support conceptual data mode.
- Entity Framework will have ableness to target different database engines in addition to Microsoft SQL Server.
- Entity framework is complex to use.
- Entity framework is slower development but has more capabilities.
- Entity framework map a single class to multiple tables
- Entity framework generate the three xml files csdl, msl and ssdl.
Conclusion :
.NET is going on along with both patterns (MVC & Webforms).Now all depends on need and requirement.So,based on need we can pickup right one.
How these Articles will be structured
During the course of these articles, I m going to explain how to Architect End to End Application using MVC with Entity Framework, starting with the ones at the beginning of the MVC and finishing with the Complate Application Architecture includes. :
- Seperating Model and DataAccess from Entity Model
- Applying Validation Using the ASP.NET MVC 4
- ASP.NET MVC Defining an application architecture:
- ASP.NET Application Development Using MVC
- How do architect an ASP.Net MVC app with EF?
- Using T4 to Generate POCO Classes
Thus far we have seen an overview of the entire ASP.NET MVC Application, and should now have a feel for the huge number of opportunities available to extend and customize how the framework behaves. We've likewise seen that not all extensibility hooks are created equal, and there are some which are more useful than others. Now that we're all on the same page, the next clause will cover how to Seperating Model and DataAccess from Entity Model .
Action Filters
ASP.NET MVC Filters allow us to inject extra logic into MVC Framework request processing, this logic either before or after an action is executed. They provide a simple and elegant way to implement cross-cutting concerns like logging,exception handling and authorization. . Below table will show you the different categories of filters that the MVC Framework supports, how to create and use filters, and how to control their execution. We can make your own custom filters or attributes either by implementing ASP.NET MVC filter interface or by inheriting and overriding methods of ASP.NET MVC filter attribute class if available.
Action Filters are used in cases where we need to perform some logic either before an action method is called or after an action method runs.
Action Filters : How to use them
Action Filters can be applied to a controller action or an entire controller. The Best known example of an action filter is the [Authorize] Attribute.
Understanding the Basic Types of Filters
The ASP.NET MVC Framework supports four different types of filters. Each allows you to introduce logic at different points during request processing. The four filter types are described in Table.
Creating a custom action filter is very easy. It can be created in four simple steps:
- Create a class
- Inherit ActionFilterAttribute class
- Override the OnActionExecuting method to run logic before the action method
- Override the OnActionExecuted method to run logic after the action method
Example
Writing an Action filter is very simple. All you need is to create a class with Name WhatEverNameActionFilter
Inherit ActionFilterAttribute class override the action methods and you are done.
using System;
using System.Collections.Generic;

using System.Web;
using System.Web.Mvc;
using System.Web.Routing;
using System.Diagnostics;

namespace CampusIndya.Models
{
public class MyActionFilter : ActionFilterAttribute
{
 public override void OnActionExecuted(ActionExecutedContext filterContext)
 {
 My("OnActionExecuting", filterContext.RouteData);
 }

 public override void OnActionExecuting(ActionExecutingContext filterContext)
 {
 base.OnActionExecuting(filterContext);
 }

 public override void OnResultExecuted(ResultExecutedContext filterContext)
 {
 base.OnResultExecuted(filterContext);
 }

 public override void OnResultExecuting(ResultExecutingContext filterContext)
 {
 base.OnResultExecuting(filterContext);
 }

 private void My(string methodName, RouteData routeData)
 {
 var controllerName = routeData.Values["controller"];
 var actionName = routeData.Values["action"];
 var message = String.Format("{0} controller:{1} action:{2}", methodName, controllerName, actionName);
 Debug.WriteLine(message, "Action Filter Log");
 }

}
}